I started using DaVinci Resolve for all sorts of post production work (editing, sound, color) in 2020.
My usage is a bit sporadic, and I often need to re-remember how to do things, so I started making a search index of tips, tricks, keyboard shortcuts, and workflows here.
Also, here is a more quickly / frequently updated list of shortcuts I am tracking.
- General
- Editing
- Editing a Feature Overview from AOD
- Cut at the End of a Word
- Play a Portion of the Timeline on Loop
- Dual Viewer Mode on Edit Page
- Punch In / Crop in Post
- Crop a Clip to Fill the Entire Timeline Frame
- Crop to 2.39 (or any) Aspect Ratio with Output Blanking
- Animate Anything (eg, Camera Tracking) with Video Keyframes
- View and Delete Video (Fusion) Keyframes for Adjustment Clips
- Cross Dissolve (Fade in / out video)
- Editor Choppiness
- Render in Place…
- Improve Choppy Slow Motion with Frame Interpolation (when you didn’t capture at a high enough framerate)
- Copy and Paste Clip Attributes
- Paste Insert at Playhead
- Paste into Any Track
- Delete a Gap on the Timeline
- UI Tweaks
- How to (Really) Use the Lower Left Third - Title Effect
- How to Burn in Subtitles Like DodFord
- DIY Multicam Timeline
- Organizing and Importing Media
- Search Text of Markers with Edit Index
- Fix Greyed-Out Export Edit Index
- Organizing Media Links
- Use no-op Adjustment Clips as Annotations
- Automatically Set Reel Names from File Pathname
- Set Human Readable Clip Names with Metadata Variables
- Keywords
- Custom Metadata Groups
- BMPCC4k Slate Scene and Shot Metadata
- Fixing Framerate (fps)
- Proxy Generator
- Deliver with Only Proxies
- Sound
- Simple Guidelines and Excellent AOD Overview
- Sync Based on Timecode
- Sync Clips Based on Waveform with Syncalia
- Syncalia Timeline Tracks Gotchas
- Syncalia Timecode and Framerate Gotchas
- Transcribe Timelines
- Background Noise Filter
- Dialog Leveler and Voice Isolation
- Removing Clicks and Using a Spectral Frequency Display
- Crossfade (Fade in + out audio)
- Normalize Audio Levels!!
- Normalizing Audio Levels (Continued)
- An Alternative to Audio Volume Keyframes
- Quick Downmix From 5.1 Channel to Stereo Channel Sound
- Fix Left / Right Audio Pan Issues
- Fix Mono / Stereo Audio Issues
- Display Different Audio Channels from wav in Separate Tracks
- Fairlight Index
- Use a Bus to Group Audio Tracks
- Apply Filters to Entire Bus
- Use Dynamics Audio Compressor
- Make Dialog a Little More Clear By Adjusting Band 1 In Equalizer
- Make Something Sound Further Away
- Simulate a Walkie Talkie Sound
- Create Ambient Outdoor “Roomtone” by Looping Smaller Clips with Offsets
- Bounce Audio to a New Layer
- Sidechain Dialog to Music
- Fix Missing Waveforms
- Target Loudness
- Mixing for Broadcast Loudness
- Check Loudness at Faster than Realtime with
Analyze Audio Levels - Mix Audio for YouTube
- Creating a 5.1 Audio Mix
- Save Voiceover Clips to Your Project Folder
- Record Voiceover with Fairlight
- Voiceover Editing Workflow
- Setup 5.1 Surround Sound Speakers on Mac for Davinci Resolve
- More Notes on Mixing 5.1
- Delivery
- Color Grading
- Color Correction and Grading Overviews
- Useful Shortcuts for Color Grading
- Pushing Color with Color Wheels Color Bars
- Quick Fix for Red Skin Tones
- Stills
- Rob’s Basic Process for Color Grading
- Is there a lum vs lum curve?
- Working with an underexposed image.
- Adjusting the Default Tone Ranges in Log Mode (from Resolve guide)
- How to Reinstall colourlab Look Designer
- Fusion
- Multiuser
General
TEST RENDER (frame rate, audio)
- Try a test export early on to make sure frame rate and sound are OK!
Live Save
- In
Preferences › User › Project Save and Load › Save Settings - Set
Live SavetoOn - I do both
Project BackupsandTimeline Backups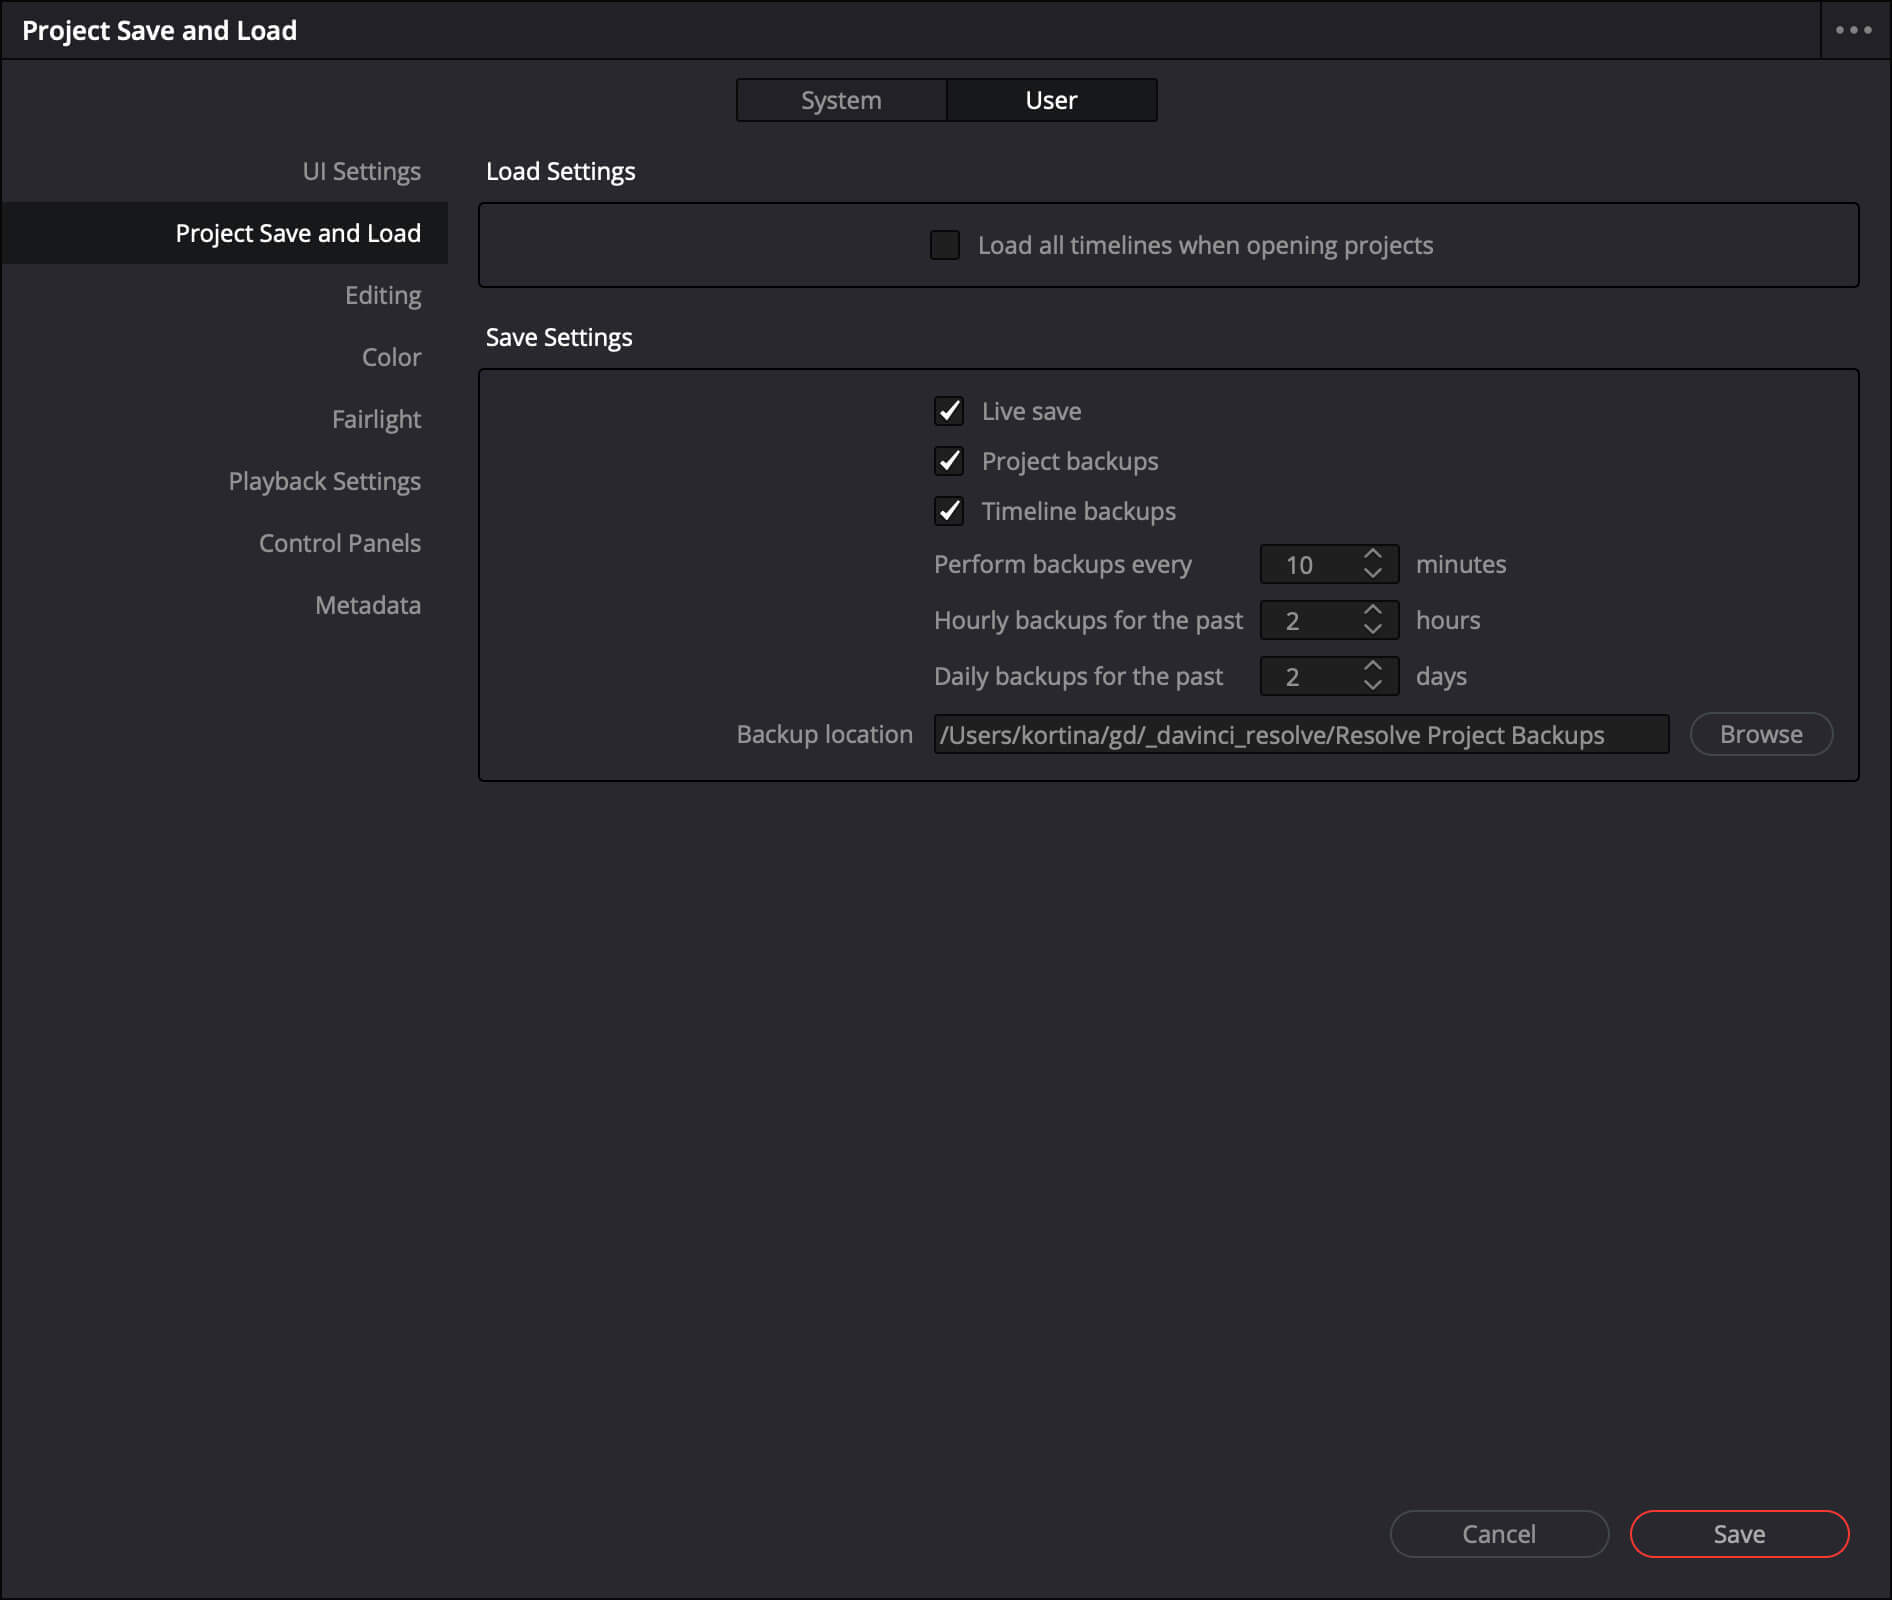
Project Settings (for Cloud Collaboration)
- Rob and I frequently collaborate on cloud projects, so we want to make sure to use the same shared directories. We use:
Master Settings › Working FoldersProxy generation location=/opt/s3/__RESOLVE/ProxyMedia(open__RESOLVEwhen setting)Cache files location=/opt/s3/__RESOLVE/CacheClip(open__RESOLVEwhen setting)Gallery stills location=/opt/s3/__RESOLVE/.gallery(open__RESOLVEwhen setting)
Capture and Playback › CaptureSave clips to=/opt/s3/projects/project-name/capture
Editing
Editing a Feature Overview from AOD
For a good overview of tips for fixing up a fine cut, I loved The Perfect Cut › Advanced Editing › Inside A Feature Edit: CLEAR SKY (8.6).
- Use the
Pitch Shifterto adjust the tone of a sound effect if it’s too LOW or too HIGH - Use Epidemic Sound for SFX source
- Good tutorial on using the
Hard Limiterto fix audio - Bonus Audio Tools to really master sound:
- De-noiser & De-esser
- Vocal Channel & Dialogue Processor
The Perfect Cut › DaVinci Resolve Tutorials › Mechanics of Editing in Resolve (10.4) also has some great tips, particularly on keyboard shortcuts for even faster editing in Resolve.
- Shortcuts Recap
- tab: next tab
- backslash: swap timeline and source viewer
- f9: insert
- f10: overwrite f11: replace
- f12: place on top
- j/k/l: reverse/play/fastforward
- -/+: 200m out/zoom in timeline
- 1/0: in and out points
- m: add marker (double click to open marker description)
Cut at the End of a Word
When editing voiceover dialog with b-roll, Rob and I found that cutting the visual on the end of a word (vs the beginning of a word) seems to generally feel a bit more natural.
Play a Portion of the Timeline on Loop
- Mark
InandOuton Timeline - Click the
Looparrow below the Viewer (so it’s red) - Choose
Playback › Play Around/To › Play In to Out ( ⌥+/ ) - To clear the loop, you can use shortcut
⌥+x
Dual Viewer Mode on Edit Page
- To load a clip into the (left)
Source Viewer, select the clip, hitEnteron it, and it will load the clip with the frame under the playhead
Punch In / Crop in Post
- Use an
Adjustment Clip › Transformand setZoomto something greater than 1 and then center the frame to your liking using thePosition X / Y
Crop a Clip to Fill the Entire Timeline Frame
- Punching in a clip to try to fill the entire frame manually can be a bit tedious (though it does have the advantage of allowing you to tweak the centering / cropping more precisely).
- A quick and dirty way to fill the frame centering the cropped image is with:
Inspector › Video › Retime and Scaling › Scaling=Fill
- You can also set this at the project level by setting:
Project Settings › Image Scaling › Input Scaling › Mismatched resolution files=Scale full frame with crop
Crop to 2.39 (or any) Aspect Ratio with Output Blanking
- Suppose most of your footage was shot in 2.39 and you have a few clips with a more square aspect ratio. A very easy way to ensure your letterbox does not jump around is to set
Timeline › Output Blankingto2.39(or whatever your desired aspect ratio is). - This will leave the source clips unchanged (though you may want to play with the
Transform › Position › YorTransform › Anchor Point › Yof your cropped clips.
Animate Anything (eg, Camera Tracking) with Video Keyframes
- You can animate all sorts of things (text animations, video transforms) over time using the diamond controls to the right of each attribute in the Video Inspector tab
- Say, for example, you want to animate camera tracking after Zooming a shot. Add an
Adjustment Layerover the clip, move the Playhead to the final frame of the clip, and on the Adjustment Layer Video Inspector, you might set:Dynamic Zoom=1.5Anchor Point: X=-860.0- click the diamond next to
Anchor Point- it will turn red
- Move the Playhead to the first frame of the clip, click the diamond next to
Anchor Pointagain, and setX=0.0 - This will track linearly over time from right to left over the duration of the clip
View and Delete Video (Fusion) Keyframes for Adjustment Clips
- After you’ve added keyframes to animate something in an Adjustment Layer you can navigate between them using the left / right chevrons next to the red diamond icon, but if you want to view all the keyframes (or delete one altogether), click the diamond icon at the bottom right of the Adjustment Layer clip to open a track below the clip that shows the various keyframes. Click one of these, it will select / turn red, and you can delete it:

Cross Dissolve (Fade in / out video)
- Drag from
Effects › Video Transitions › Cross Dissolveonto a clip to dissolve it in. - Another thing that might cause choppiness is insufficient disk space. I use Daisy Disk to quickly view disk usage, and recently when I had a choppiness problem, I opened my external drive in Daisy Disk and noticed a huge amount of space was marked has
hidden space, so I emptied Trash on my Mac while the disk was attached and this cleaned up some of that space.
Editor Choppiness
- Setting
Project Settings › Timeline Resolutionto720psolved a lot of choppiness issues.
Render in Place…
- If something is real choppy and you’re pretty sure you’re not gonna change it a lot, you can right click and
Render in Place... - If you need to undo this later, right click and
Decompose to Original
Improve Choppy Slow Motion with Frame Interpolation (when you didn’t capture at a high enough framerate)
- On the Clip Inspector, set:
- In
Retime and Scaling:Retime Process=Optical FlowMotion Estimation=Speed Warp
- In
Speed Change:Ripple Timeline=On(this will increase the clip duration as you slow it down)Speed %= something < 100
- In
- NB: this may be choppy in the DaVinci Resolve preview.
- Try a test export to see how it looks
- You can also set
Playback › Render Cache=Smartto improve the playback within Resolve - OR, right click the clip and
Render in Place...
Copy and Paste Clip Attributes
- Select a source clip,
cmd+cto Copy - Select all target clips,
alt+vto Paste Attributes
Paste Insert at Playhead
- Cut the clip you want to insert
- Move Playhead, hit
cmd+shift+v - NB: if your Playhead is in the middle of a clip (vs between two clips), it will split the clip in two to do the insert
Paste into Any Track
- By default, if you cut a clip from
Track nin Resolve, it will paste back into the same track (n) - To paste to any track
- turn off
Auto Track Selectorfor all tracks byshift+click-ing theAuto Track Selectoricon to the left of the timeline - turn on
Auto Track Selectorby clicking the track you want to paste into - paste
- turn back on
Auto Track Selectorfor all tracks byshift+click-ing theAuto Track Selectoron any track again
- turn off
- via Jason Yadlovskihttps://www.youtube.com/watch?v=D535CC4ObJo)

Delete a Gap on the Timeline
- Select the gap by clicking it on the timeline. It will turn darker grey.
- Hit
backspace
UI Tweaks
- I like to turn on
Show focus indicators in the user interfaceinPreferences › User Interfaceso I can see what’s selected
- I like to turn on
Stacked TimelinesinTimeline View Optionson theEditpage
How to (Really) Use the Lower Left Third - Title Effect
- For awhile, I was in the habit of using the
Text+effect any time I wanted to display some SUPER text over the image. - One of the drawbacks of this is that it’s a bit clunky to align two bits of text that you want to have different styles.
- So I went back to trying to use the
Lower Left ThirdTitle Effect, and put some time into trying to figure out how to use it. - Here is where I landed with it after a quick pass:
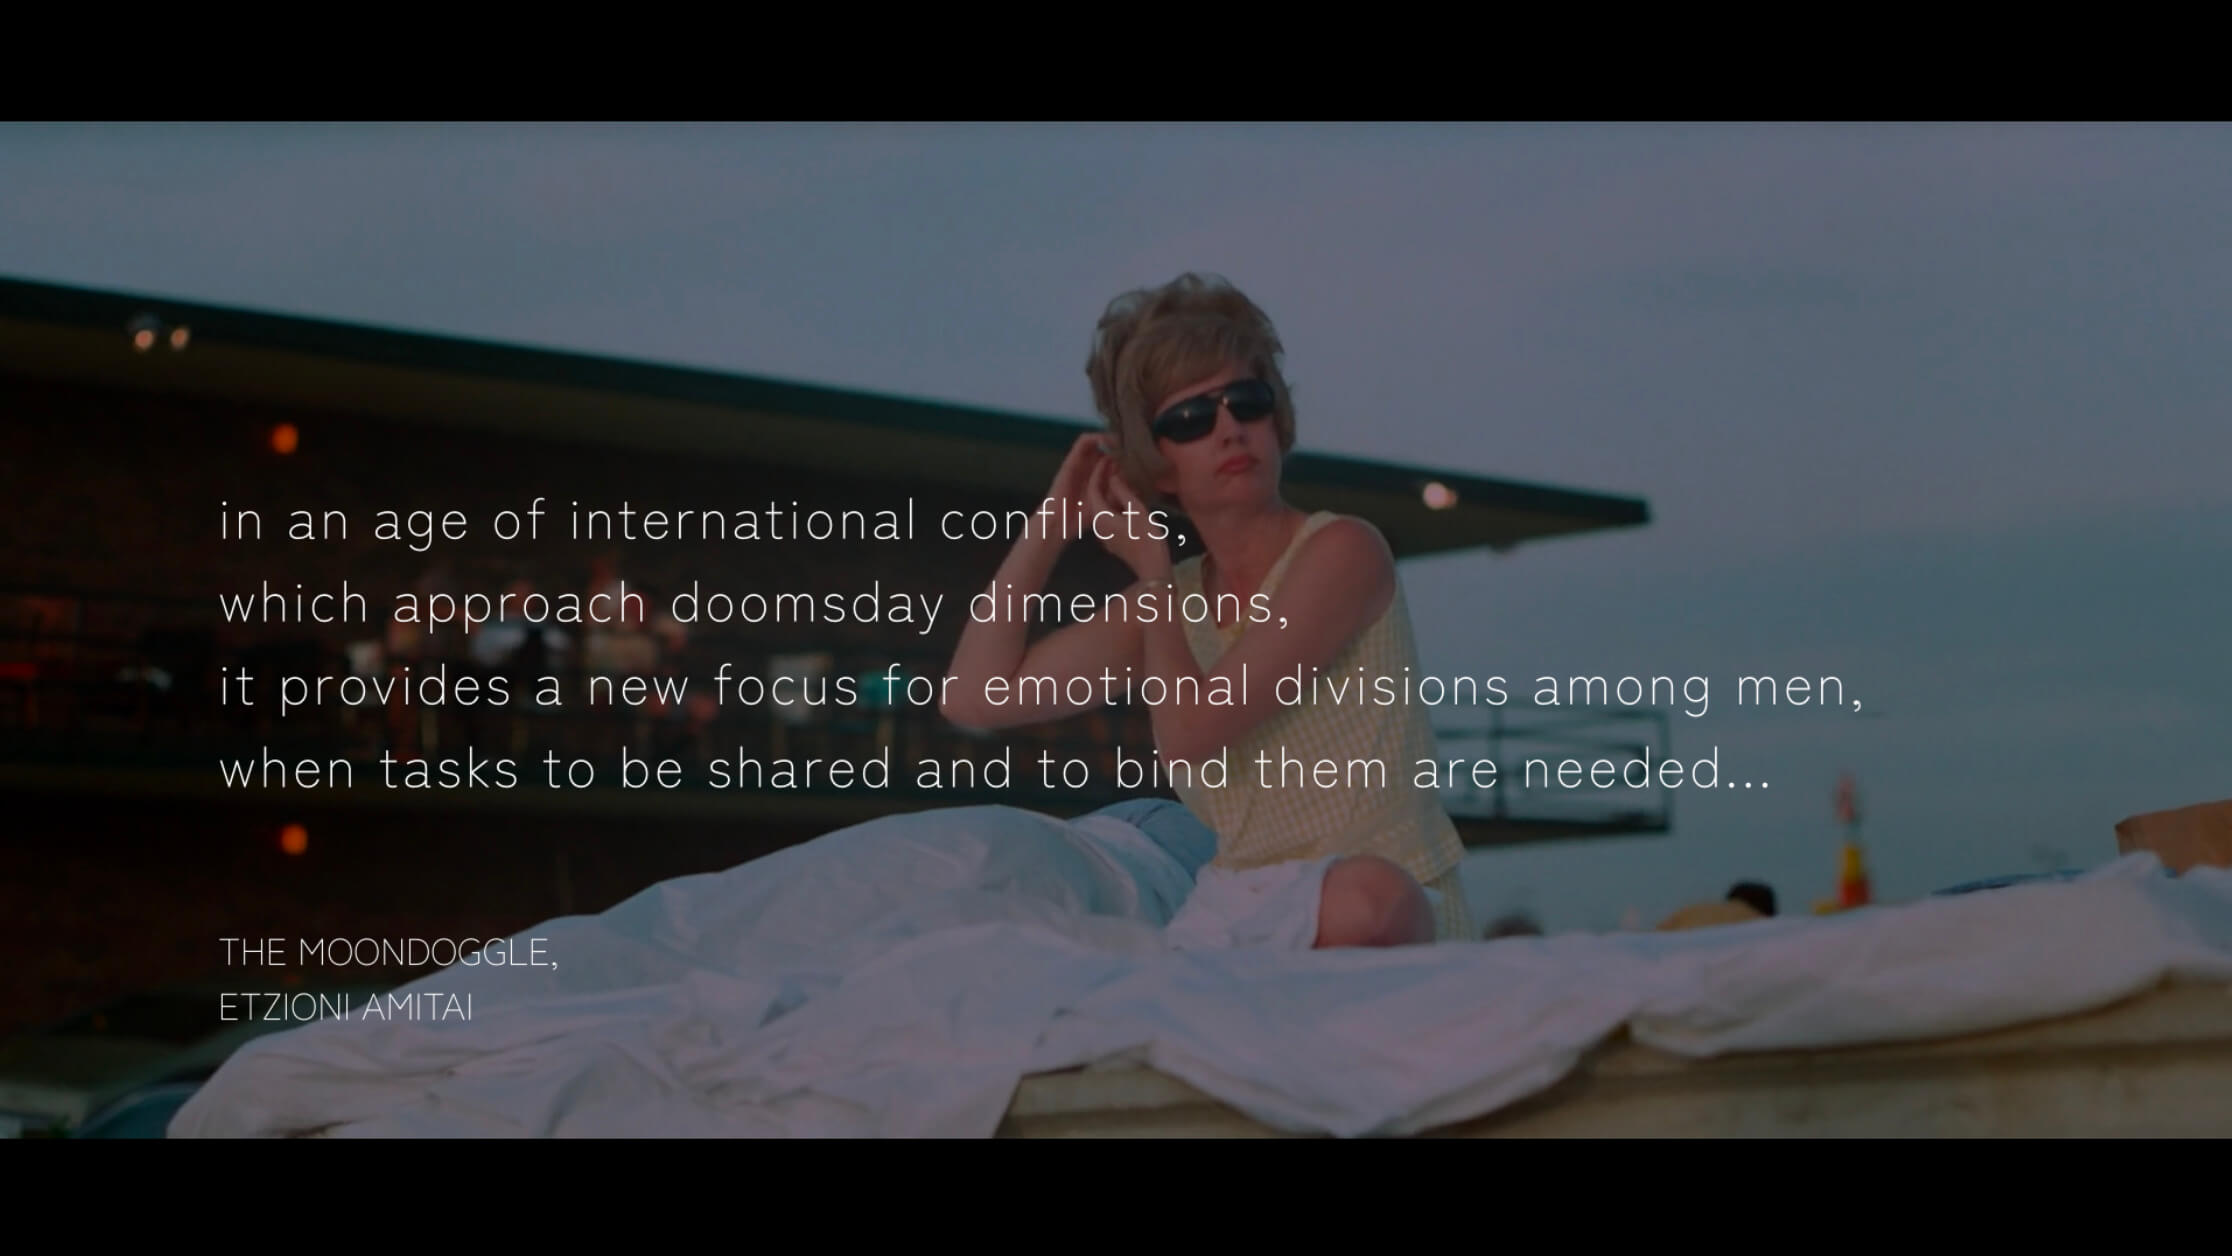
- Ignore the kerning for now…
- Basically, I wanted a way to display both a quote and a source, in a way that they would align nicely no matter how long the quote or source text was.
- What I ended up doing was this:
- Use the first
Rich Textfield for the source, and the second for the author. (Originally, I had the quote first, but the text of the secondRich Textshows on the clip in theTimeline, and I figured this was more likely to be unique than the source, so I flipped them.) - Align the mid-point between the quote and the source to roughly the bottom third of the screen, such that:
- a longer source grows downwards
- a longer quote grows upwards
- and where they meet is consistent
- Doing this meant setting
Anchor=Topon the source andBottomon the quote, then choosing a rough offset 360 (1/3 x 1080px Timeline Height) for each. Here are the exact settings I used:- Source
Font Family=Zen Kaku Gothic NewFont Face=LightSize=32Tracking=0Line Spacing=0Font Case=All CapsAlignment=LeftAnchor=Top+LeftPosition X=192Position Y=290Zoom X=1Zoom Y=1
- Quote
Font Family=Zen Kaku Gothic NewFont Face=LightSize=48Tracking=11Line Spacing=1Font Case=MixedAlignment=LeftAnchor=Bottom+LeftPosition X=192Position Y=390Zoom X=1Zoom Y=1
- Source
-
I then had to manually wrap the text for the quote, so I figured out about how many characters per line (
63) would match the192left padding (Position X) and wrote myself a little one liner to reformat text from the clipboard to this maximum line length:pbpaste | fmt -w 63 | pbcopy 
How to Burn in Subtitles Like DodFord
- I recently came across a channel I really like DodFord and spent some time replicating the way he burns in some subtitles. NB: he uses Roboto and I swapped out with a font I prefer.
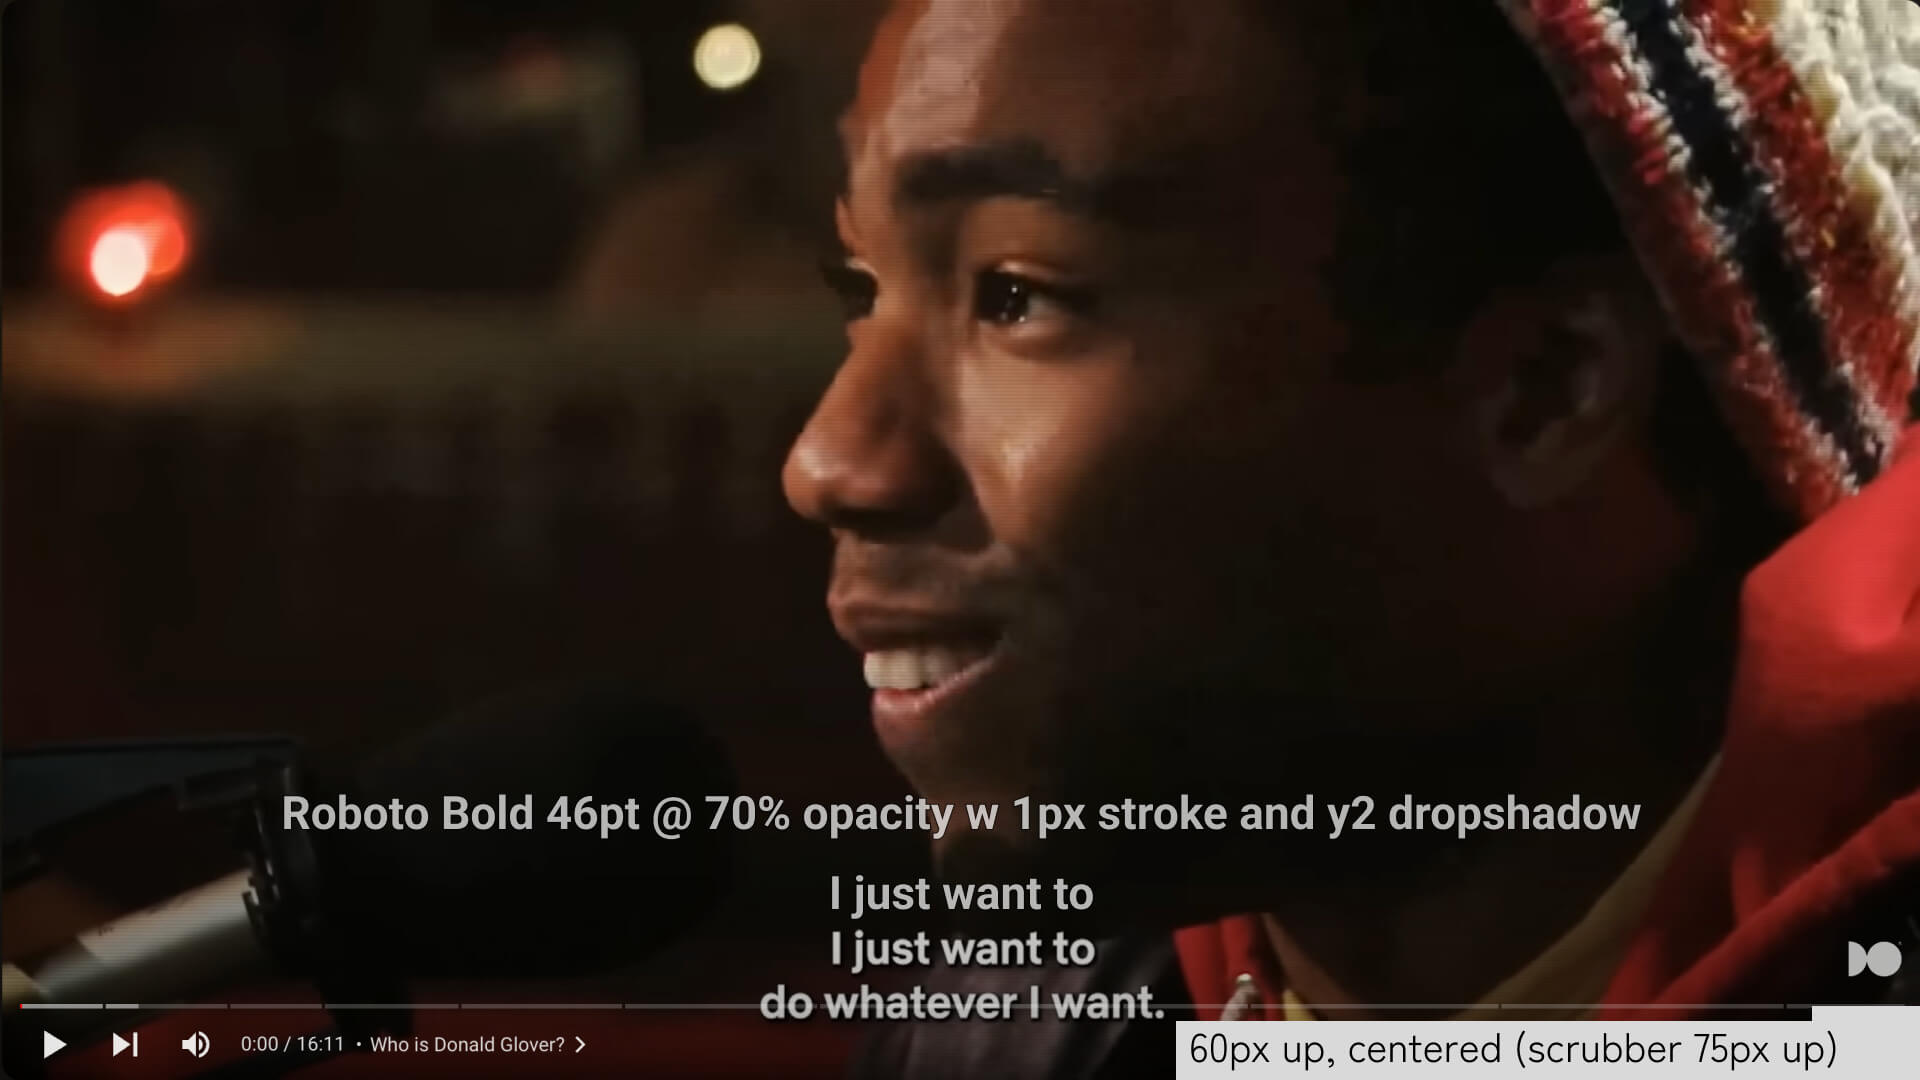
- On the
Edit Page, select a subtitle clip, and go toInspector › Trackand set:CharacterFont:Zen Kaku Gothic New(switched fromRoboto)Face:BoldColor:WhiteSize:50Alignment:Center
StrokeColor:BlackOutside Only:Yes
TransformY:130.00Opacity:80.00(switched from70.00)
Drop ShadowColor:BlackOffset X:-2.00Offset Y:-2.00Opacity:75
DIY Multicam Timeline
- I’ve got a multicam (3 cameras) project I’m editing in Resolve, and I wanted a way to easily view all the cameras at once. I don’t particularly love working with multicam clips out-of-the-box in Resolve, so I decided to make a DIY multicam timeline.
- Basically, I wanted a way to have all my clips laid out on video tracks separately AND have a multicam view where I could see all of them at once. Here’s what I did:
- Export a timeline with clips from each device in a separate track and use Syncalia to auto-align everything using waveforms
- Import that timeline back into Resolve
- Duplicate the synced timeline. NB: this is important because creating a multicam timeline is a destructive process.
- Right click one of the synced timelines and
Convert to Multicam Clip - Drag this clip into a new topmost track in the synced timeline that still has each device on a separate track (for me this ended up on
V5) - Open
Dual Viewer Modein the Timeline Viewer - On the Left Viewer, choose
Multicamas the source:
Organizing and Importing Media
Search Text of Markers with Edit Index
- You can access all the the text from the markers in the
Edit Indexview of the left pane of the Edit mode. Search the text with theFilter(magnifying glass) button.- NB: You may need to change the
Filter bytoAll Fields.
- NB: You may need to change the
Fix Greyed-Out Export Edit Index
- If your link to
Export Edit Indexgets greyed-out, the only reliable hack I have found is to quit and re-open Resolve on MacOS Sonoma. (Others have recommended closing and re-opening the timeline, but that has not worked reliably for me.)
Organizing Media Links
- Editing A Documentary - Workflow Organization & Project Setup in DaVinci Resolve. From a doc editor (with tons of footage).
- bins for media from each shoot day:
day-01,day-02, … - bin for
timelines - timelines for
stringouts: footage from each day, ordered by timecode, so you can easily scrub through the entire day- NB: when you have multiple clips selected in a bin and add them to a timeline, the timeline order seems to be dictated by the column you are sorting by in the media panel
- timelines for
selects: copy each day’s stringout timeline, annotate good stuff, remove the bad stuff - likewise, making an
outtakestimeline early on is a useful thing to do so you can just throw stuff there as you come across it.
- bins for media from each shoot day:
- DaVinci Resolve 17 Edit Training - Introduction to Editing Part 1. Video from Blackmagic on organizing and inserting clips in different timeline modes.
Use no-op Adjustment Clips as Annotations
- via HOW TO STAY ORGANIZED WHILE EDITING - DaVinci Resolve Video Editing Tutorial.
- This guy uses Adjustment Clips as notes. Select the Adjustment Clip, open
Inspector, chooseFile, setNameto something human readable
- This guy uses Adjustment Clips as notes. Select the Adjustment Clip, open
Automatically Set Reel Names from File Pathname
- Under
Project Settings › General OptionscheckAssist using reel names from the: Source clip file pathname- I used
/live-video/%R/to get a reel for each day, egday-01,day-02, etc - This is useful in case you want to isolate the reel as a variable, eg, to make a Smart Bin or to use in the Clip Name
- I used
Set Human Readable Clip Names with Metadata Variables
- NB: I only wanted to do this with video files, and since they were in separate bins for each day, to select them all, I made a
VIDEOSmart Bin:Match Any of the following rules:MediaPool Properties › File Name › contains BRAWMediaPool Properties › Format › contains RED
- Select all the video clips, right click, choose
Clip Attributes - I set the name to
%Scene // %Take -- %Format(%will give you a type-ahead for all the metadata available as variables)
Keywords
- I believe you can search these in the Edit Index (tho I have not used them much yet).
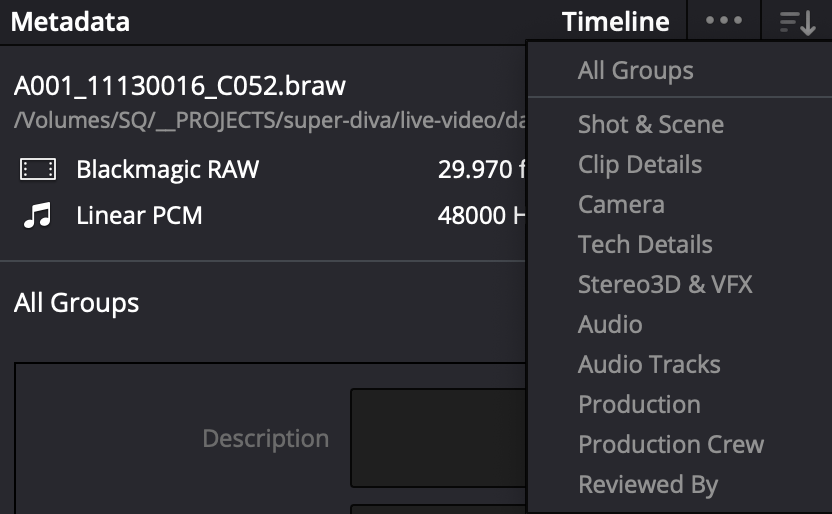
- In order to get these to show up in the
Metadataviewer / editor, I had to use this dropdown and chooseAll Groups (or Shot & Scene):
Custom Metadata Groups
- I don’t think I’ve used this yet, but seems useful.
- In
Preferences › User › Metadata, you can set up your own custom metadata groups…
BMPCC4k Slate Scene and Shot Metadata
- OK, this is a bit more of a camera tip than a Resolve Tip, but…
- I was kind of frustrated that the bmpcc4k slate did not allow you to set the shot number:

- I posted about this on the Blackmagic Forum and learned you can kind of fake scene+shot by tapping the number in the center of the Scene slate. One of the options you’ll see is
1A- If you choose this, then the
›will increment to1B,1C, etc. - Likewise, according to the forum, you could use
10-1or ` 0.1or10Aor10 Aor10 1or10.1aor10/1` and these should all do the right thing.
- If you choose this, then the
- Here is another long forum post on the topic.
Fixing Framerate (fps)
- On one project, we realized after we imported everything into DaVinci that we had shot everything in 60fps. When we imported, DaVinci asked us to auto change the Project Timeline settings to 60fps to match the imports. BUT, 48hfp required us to export at. 24fps and apparently in DaVinci you MUST export at the project timeline settings.
We had two options.
Option 1: Export from DaVinci at 60fps and then convert to 24fps after the fact:
# inspect the fps, was 60
ffmpeg -i  scene-06.mov

# convert from 60 to 24fps by dropping frames (vs changing duration)
ffmpeg -i scene-06.mov  -filter:v fps=fps=24 scene-06-24fps.mov
We would have done Option 1 if we had more work on the project done before we realized this error, but since we had done relatively little, we opted for Option 2.
Option 2: Create a new DaVinci project and DON’T change the Project Timeline fps when DaVinci prompts to do this on initial import.
Then, for all of the clips that are at 60fps, right click, select Clip Attributes and change Video Frame Rate from 24 to 60 fps.
NB: we did this once clips were in a timeline, BUT I think we might have been better off trying this in the Media Pool.
Proxy Generator
I often have a 4TB solid state drive velcro-ed to my laptop to store large project folders, but this can get slightly annoying. In the Blackmagic DaVinci Resolve 18 release, I learned about new Proxy workflows I wanted to give a try – essentially, these allow you to seamlessly switch between .braw and .mov Proxy files, intelligently using whatever files are on your drive and allowing you to select a preference for one over the other if you have both.
This is good primer on how the tool works.
My first pass was to run it on the project folder on my external SSD and then rsync everything except the .braw files over to my laptop HD:
❯ rsync -av /Volumes/SQ/__PROJECTS/jason-mattress/ /opt/s3/projects/jason-mattress --exclude='*.braw'
In the future, I may switch this up to skip creating a project folder on my SSD altogether and have Proxy Generator directly send Proxy files to the laptop drive.
Deliver with Only Proxies
- I had some trouble delivering / exporting from a laptop where I only had proxies. I was using the Vimeo preset, and it turns out it’s only possible to deliver with proxies from Custom Export.
- Under
Videosettings, I checked:Network Optimizationand underAdvancedI checkedUse optimized mediaandUse proxy media. - See this forum thread.
Sound
Simple Guidelines and Excellent AOD Overview
I’ve been doing some courses from The Art of Documentary, and specifically wanted to call out The Perfect Cut › Advanced Editing › Audio Basics (8.1). The equalizer tutorial in this video, in particular, is excellent.
- Use track level Gain adjustments first!
- Use either the Hard Limiter or (Compressor) to reduce loud sounds (and lift up lower sounds). Your goal should be to remove all the
REDpeaks where things go above-3dB. - General Target Guideline to Audio Levels
- Overall Mix: - 10dB to -6dB / max -3dB
- Dialogue: - 12dB to -6dB / max -3dB
- SFX: - 18dB to - 10dB/ max -3dB
- Music: -22dB to - 12dB / max -3dB
Sync Based on Timecode
- caveat: When I imported media from different days into a single bin, then tried to
Auto Sync Audio › Based on Timecode and Append Tracks, I had a strange sync ERROR where there were lots of mistakes. I think this was (maybe?) a result of time-code only being unique within a particular day (not unique across the entire shoot?). It seemed to work better when I separated media for each day into separate bins,day-01,day-02, etc.- Once you have successfully done the sync, when you drag a video clip that has been synced to a sound file into a timeline, the synced sound file will automatically appear as a linked clip in the audio tracks below the video clip audio.
Sync Clips Based on Waveform with Syncalia
- I’ve found the 3rd party software Syncalia does a much better job of syncing clips using Waveform than the native DaVinci Resolve tool for this:
- Drag all video and audio into a Timeline named “Everything”
- Open the timeline and
File › Export AAF, XMLand export anfcpxmlfile. - Open in Syncalia. Sync. Export XML.
- Import the xml back into DaVinci, name
Everything - SYNC. - Almost all of the audio should be synced.
Syncalia Timeline Tracks Gotchas
- Syncalia does not seem to preserve which source files go in which video and tracks in the timeline. I like to have each device in its own track, so this is my workflow:
- In the Media Pool (not in the Timeline), after re-importing the SYNC timeline exported by Syncalia, with SYNC timeline open, open the
Filter byand choose name and then type something to find all the media from a particular device, eg: “braw” or “Tr1” or “zoom”
- In the Media Pool (not in the Timeline), after re-importing the SYNC timeline exported by Syncalia, with SYNC timeline open, open the
- Select all the files from the device in the Media Pool, right click, then set
Clip Color - Then, in the Edit Timeline,
Select Clips by Clip Colorand shift drag these to a dedicated track. - (I’ve found different clip colors for media from different devices is generally useful).
Syncalia Timecode and Framerate Gotchas
- I had an issue where exporting clips to Syncalia and then bringing them back in was leading to “Media Offline” errors (“failed to link because the timecode extents do not match any clip in the Media Pool.”)
- I did a bit of googling, and changing the following two settings seemed to help:
- in
Project Settings › General Options › Conform OptionsSetUse timecode = From the source clip frame count - I still had errors after this, and I realized the stringouts timeline I exported was set to
24fpsbut my camera source clips were23.976fps - I created a new timeline,
stringouts-23-976in23.976fps
- in
- I copied everything from the un-synced
stringoutstimeline into this new one, exported it, re-synced with Syncalia, re-imported, and had much fewer errors. - I repaired the missing (zoom audio) files by placing the playhead at the beginning of each
Media Offlineclip and dragging the correct clip from the media pool into the correct track.
Transcribe Timelines
-
I saw a tip that you can transcribe timelines automatically as DaVinci markers with a service called Simon Says. I have not yet tried this.
- Keyboard Shortcuts: find them all under
DaVinci Resolve › Keyboard Customization - Edit FASTER with Metadata in Resolve 17 - DaVinci Resolve Editing Workflow Tip
- another video on editing metadata
- Understand the 4 Edit Modes in DaVinci Resolve 16 (Move, Resize, Slip, Slide, Ripple, Roll Edits) - THIS IS GREAT
Background Noise Filter
- Choose
Noise Reduction › Auto Speech Mode(the default seems to be for this to be radio selected to Manual)
- Good also for removing mic buzz.
Dialog Leveler and Voice Isolation
- Resolve 18.1 added 2 new awesome tools for cleaning up dialog: the Dialog Leveler and Voice Isolation features in the Audio properties for a clip

Removing Clicks and Using a Spectral Frequency Display
- I used to just manually edit these out, but just learned some other tricks for this via these two YouTube videos:
- How To Remove Mouth Noises In Your Recordings
- Manually remove in the Edit Timeline.
- Use a Spectral Frequency Display (like iZotope RX, see below) to visually remove particular frequencies.
- Use the iZotope RX De-Click Plugin.
- Eat some green apples to rebalance acid in your mouth while recording.
- Drink some warm tea or water while recording to rehydrate your mouth.
- DaVinci Resolve FAIRLIGHT TIPS // iZotope RX Integration
- The analyzer shows time on the x-axis and and frequency range on the y-axis.
- You can use iZotope RX as a plugin in Fairlight to visually remove certain frequencies at certain times.
- You click save in iZotope RX and it will update the clip in Fairlight, but you can go back to the original in Fairlight by turning on
View › Show Audio Track Layersand the lower disabled layers will have the original audio. 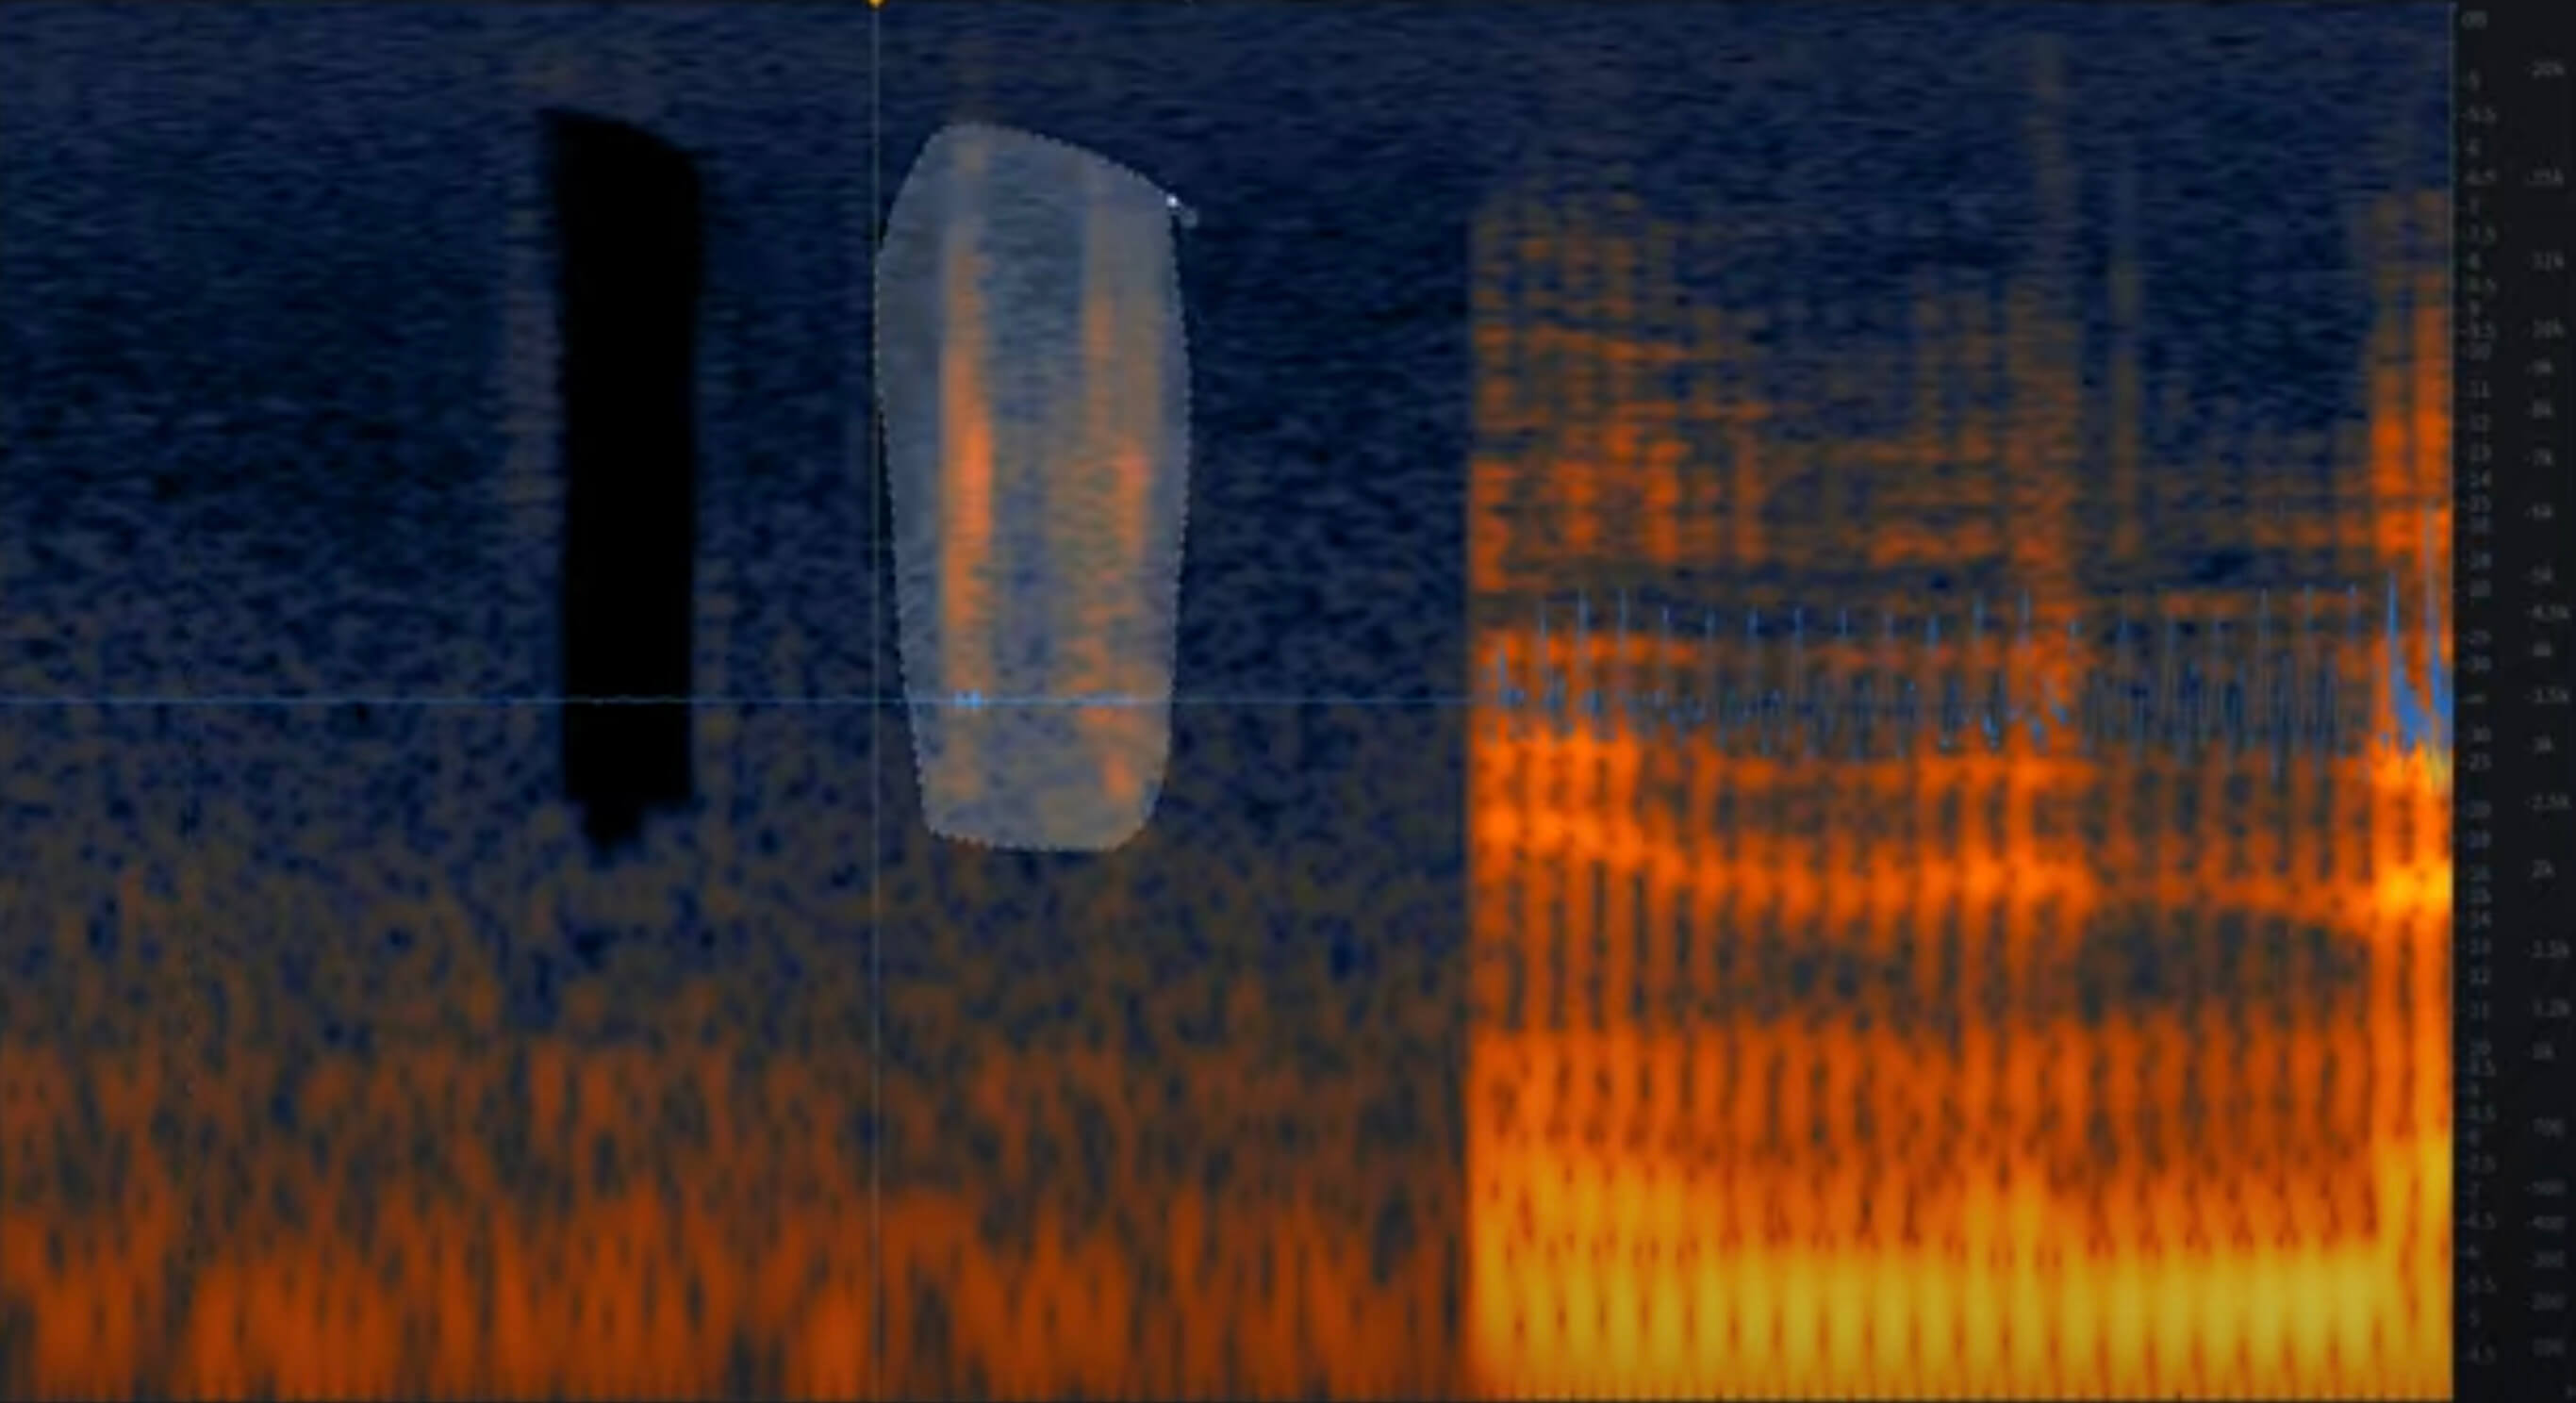
Crossfade (Fade in + out audio)
- Select an audio clip and hit
cmd+t(fade in + out) - Useful for removing some clipping / clicking on audio in / out.
- OR with mouse, grab the white dogear on the top left / right of a clip and drag it towards the center:

- OR right click the transition between 2 audio clips and
Add 6 frame Cross Fade 0db:
Normalize Audio Levels!!
Normalize Audio Levelsworks GREAT! Right click on audio clip to do this.- We targeted
-4db(instead of the default -9db) for the max peaks. - We also found that you definitely want
Set Level = Independent(not relative for this), which will bring the peak for each clip to the target (vs the peak across clips). - Finally, if there is any clip with NO DIALOG, it will be WAY too high after this, so go through and find clips that are just background and bring them back down to 0 (or even lower).
Normalizing Audio Levels (Continued)
- split dialog (different speakers), bg sound, everything to different tracks
- consider using separate INT and EXT tracks for each speaker, eg,
D/INT ABBYandD/EXT ABBY
- consider using separate INT and EXT tracks for each speaker, eg,
- for each track,
Normalize AudioNormalization Mode=True PeakTarget Level=-12.0 dbSet Level=Independent
An Alternative to Audio Volume Keyframes
- Split a clip in two (
alt-s), add a Crossfade on the transition, and adjust the level of each new sub-clip independently:
Quick Downmix From 5.1 Channel to Stereo Channel Sound
- I am working on a film essay where I want to “downmix” a 5.1 channel audio track to a stereo channel track.
- This superuser thread linked to a good ffmpeg tutorial (which I have read but not yet tried
;)). - After messing with some of the tools I used to [Fix Left / Right Audio Pan Issues][#fix-left–right-audio-pan-issues], I found what mostly worked was this:
- Put all the 5.1 channel audio clips in a single track (
A7in these diagrams). - On
Fairlight › Mixer › A7 › Effects In:Effects In: I addedTools › Fairlight FX › Stereo Fixer- I watched the meters and set
Format:Monobecause it looked the most balanced for most clips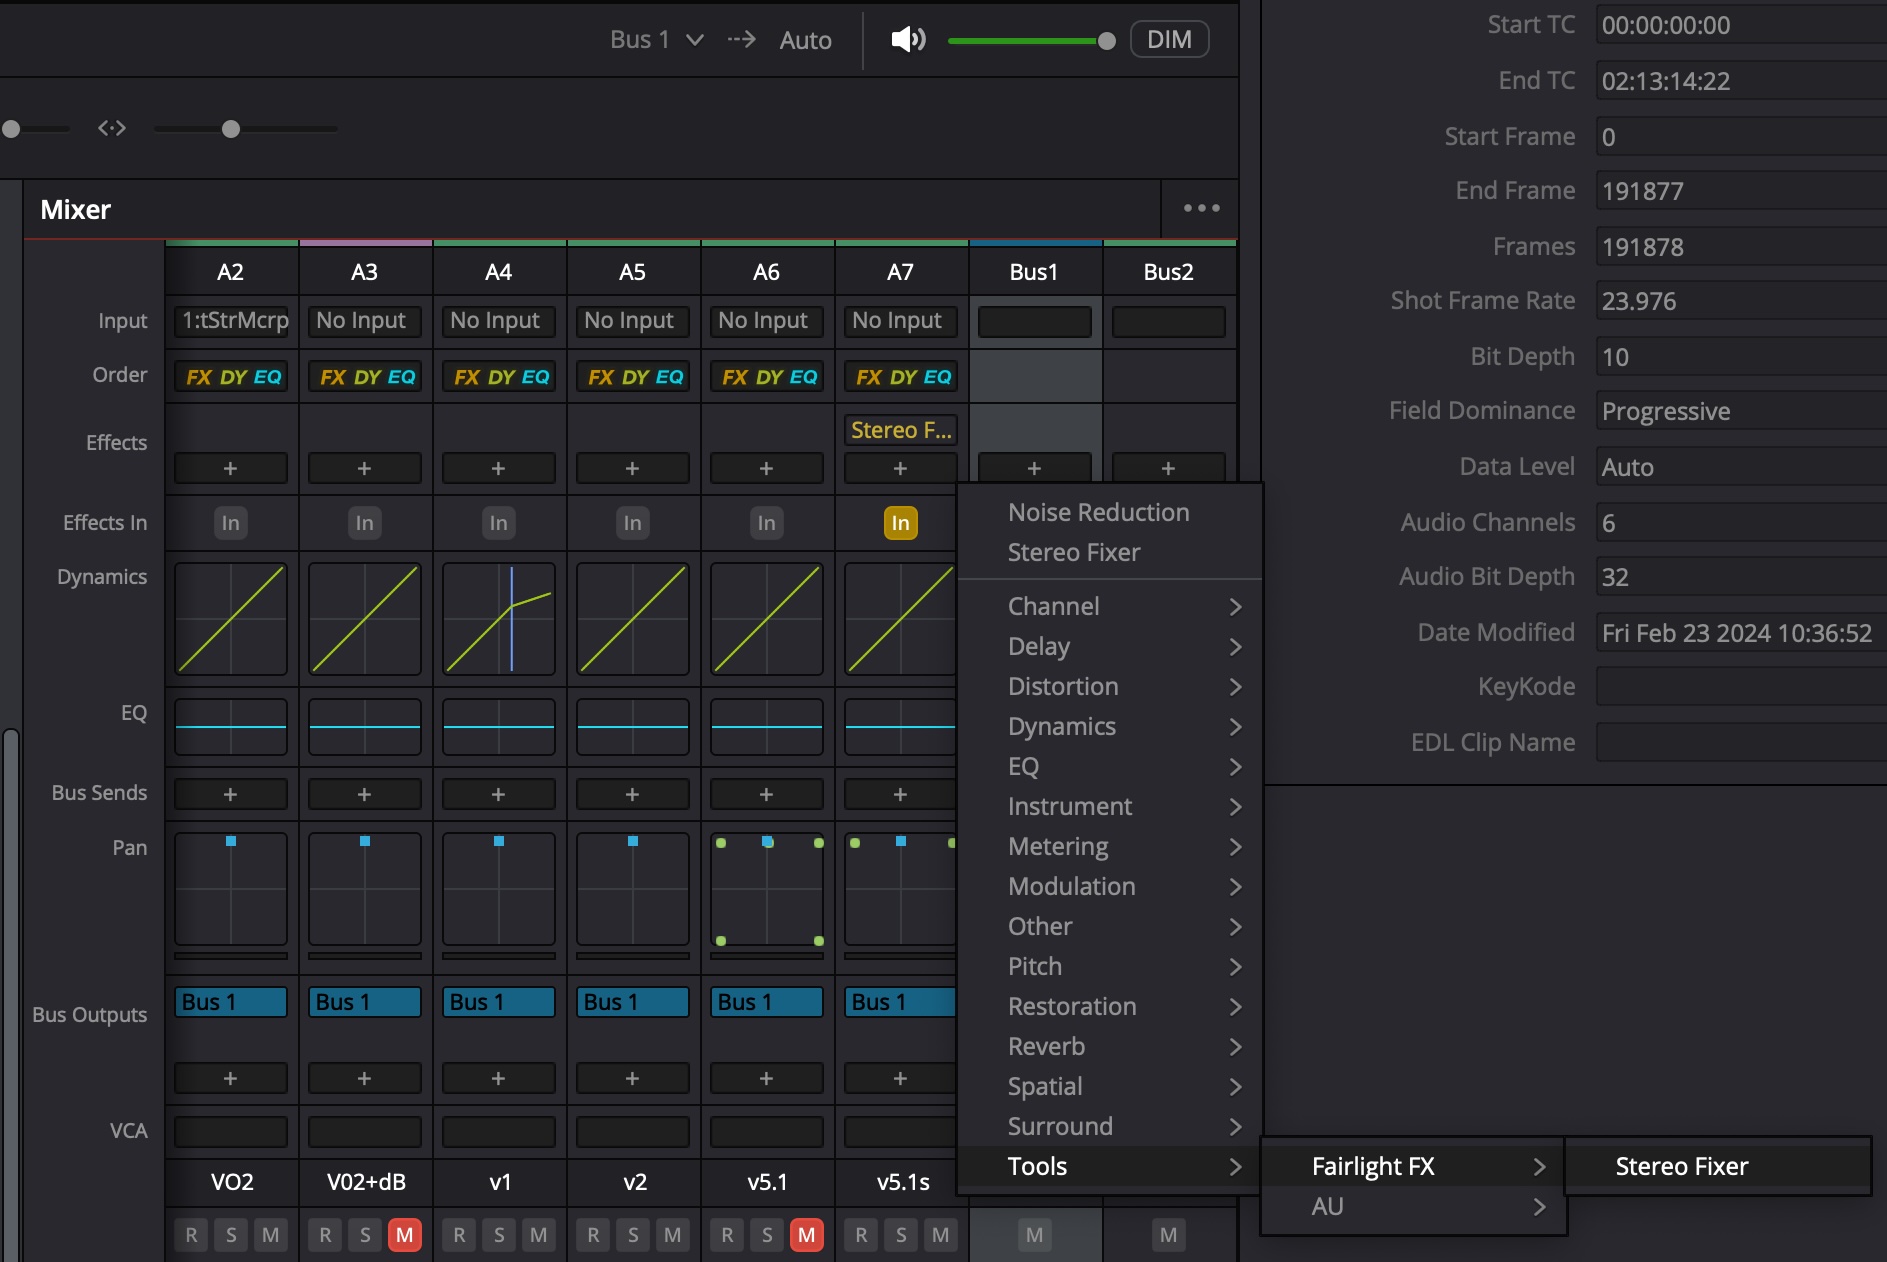
- I watched the meters and set
- There were a HANDFUL of tracks where I was getting almost NO AUDIO however. Take a look at this clip for example:
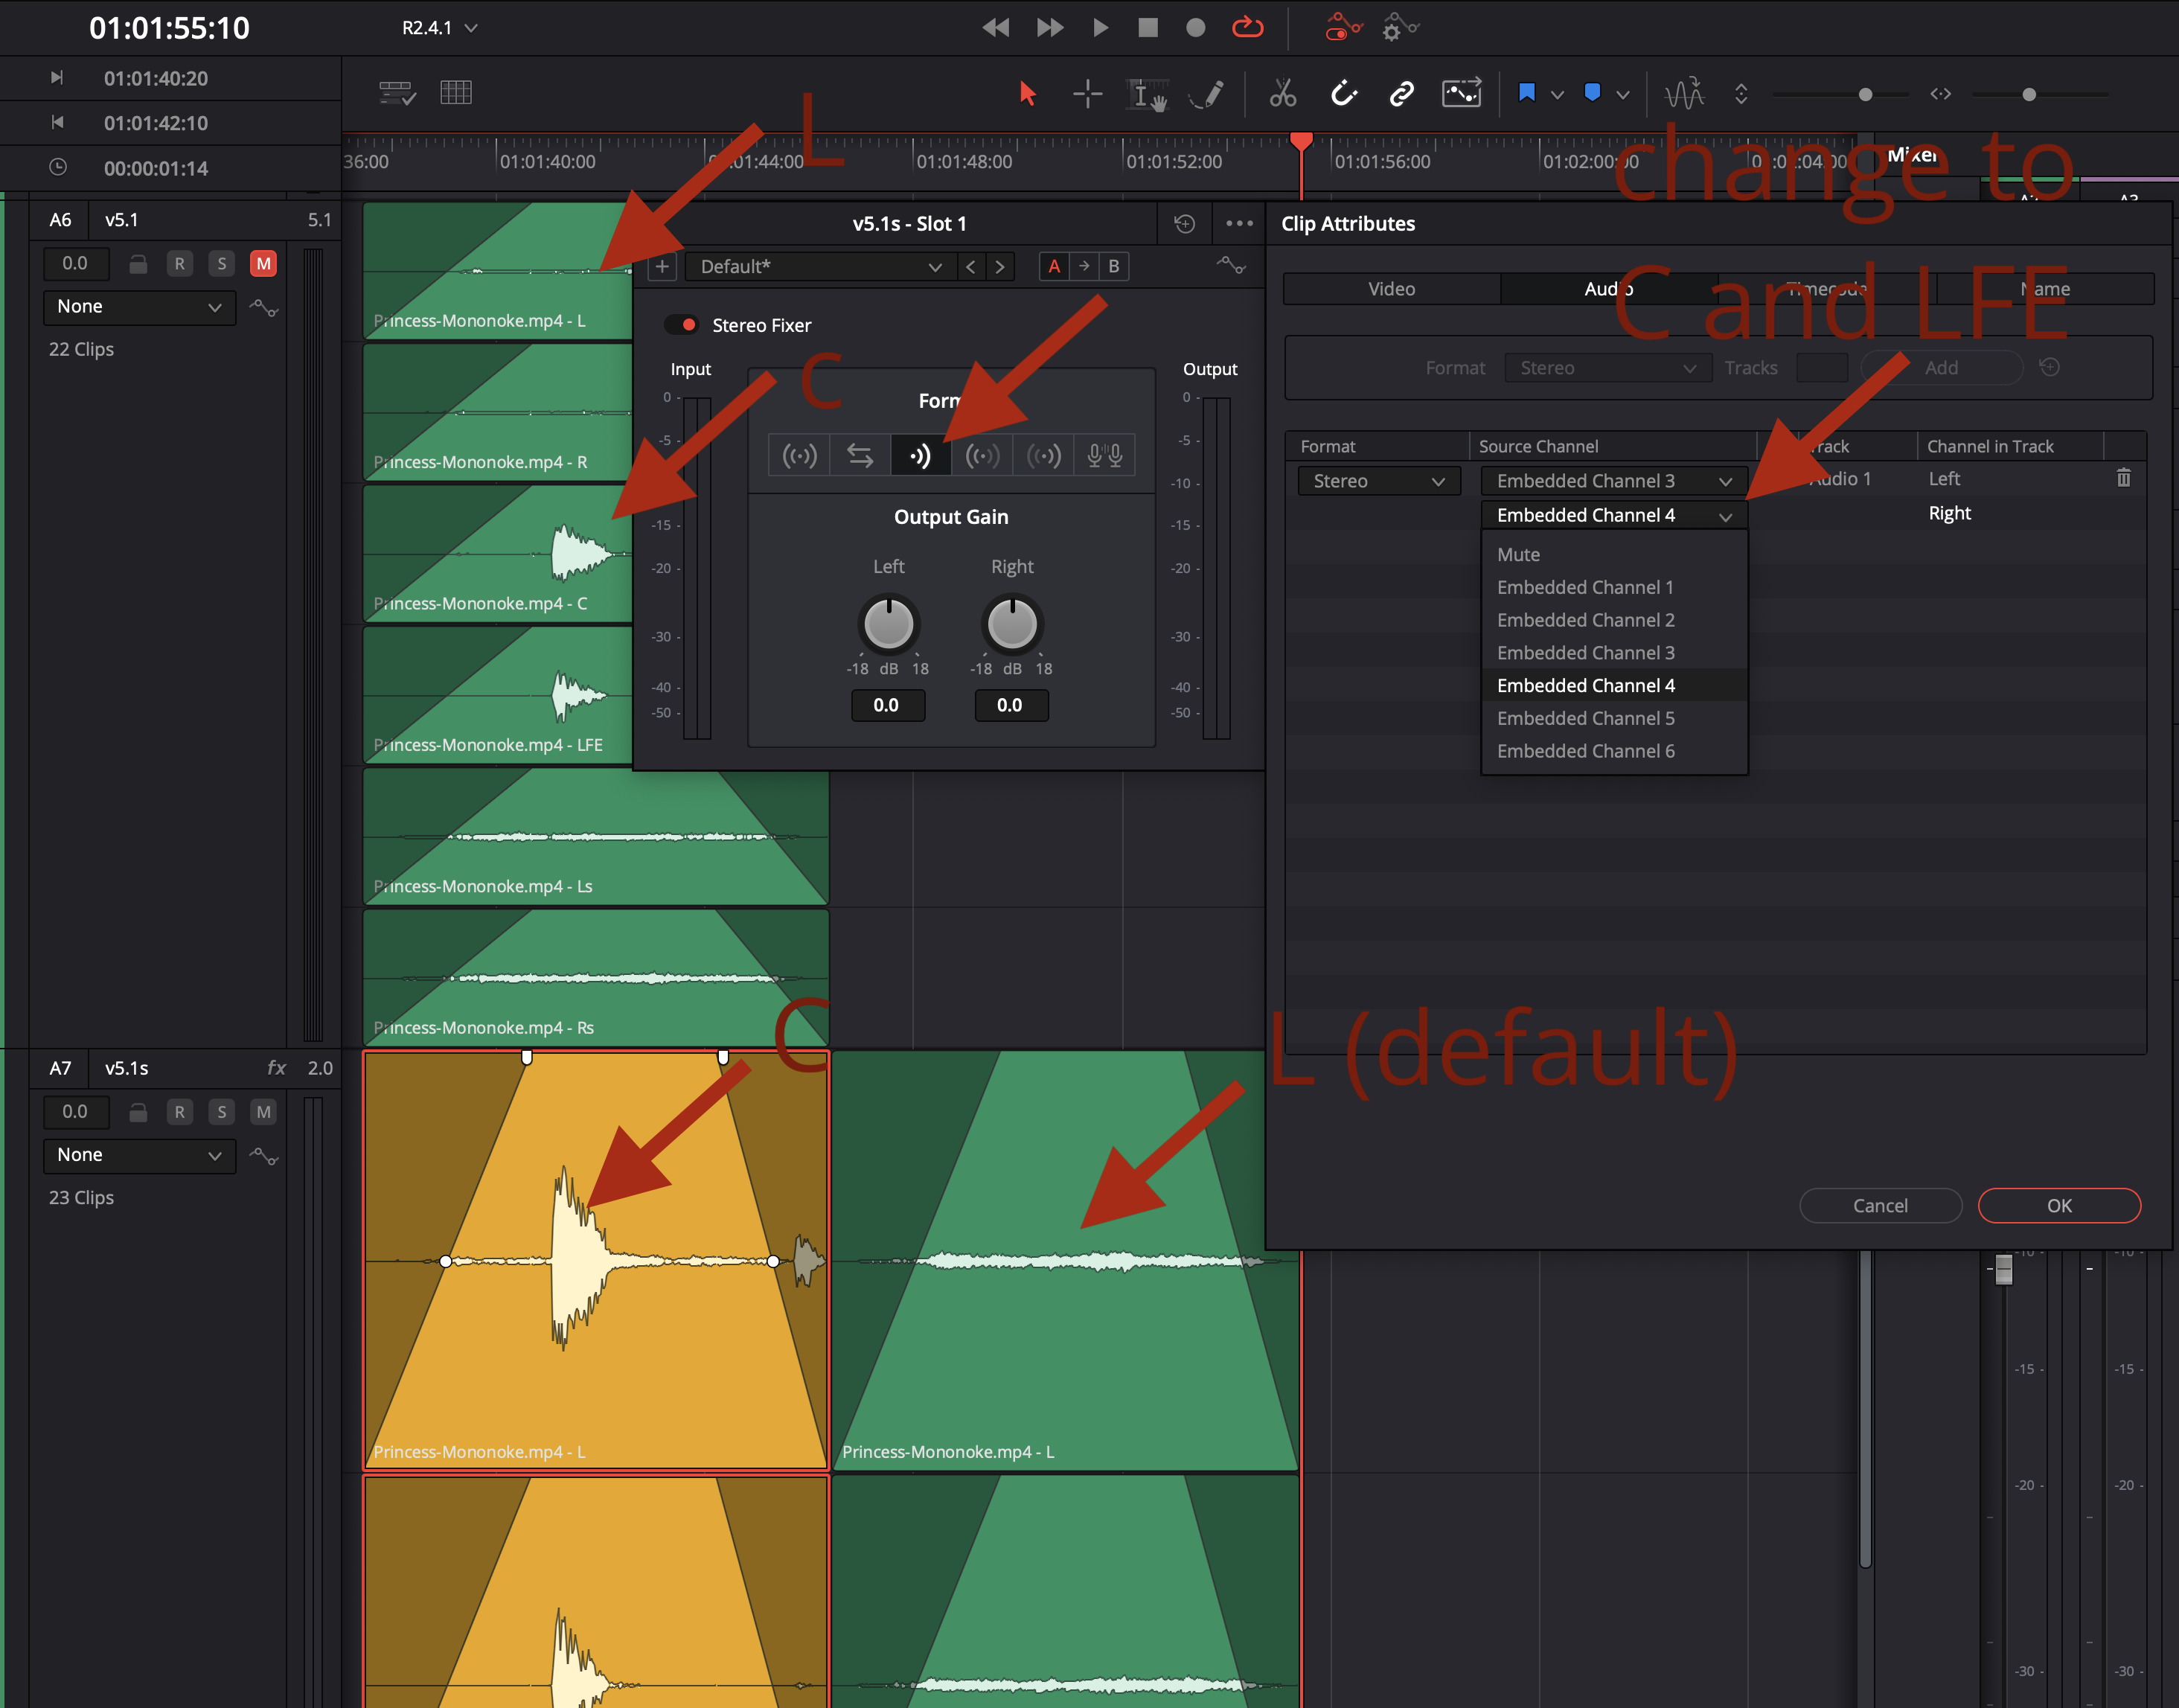
- If you look at the SOURCE audio file (Green Clip in
A6)- You can see the waveform bumps in
Embedded Channel 3: CandEmbedded Channel 4: LFE - I made a copy of this default behavior as the Green Clip in the right part of
A7. You can see the default bumps are to:Source Channel › LtoEmbedded Channel 1: LSource Channel › RtoEmbedded Channel 2: R
- So, I right clicked the Yellow Clip, and in:
Clip Attributes › AudioI setSource Channel › LtoEmbedded Channel 3: CSource Channel › RtoEmbedded Channel 4: LFE
- You can see the waveform in the Yellow Clip looks much closer to the composite of the waveforms in channels 3 and 4 than the Green Clip.
- I colored the modified clip Yellow just to keep track of this change.
- You can see the waveform bumps in
Fix Left / Right Audio Pan Issues
- I was only getting audio from left earbud, this time to fix I had to set the tracks in the Timeline to match the type in the media pool, which was mono:
Make sure you set both tracks type to mono. Then panning should work. Track type should match source file type. /via https://forum.blackmagicdesign.com/viewtopic.php?f=31&t=62118
Fix Mono / Stereo Audio Issues
- We had some issues setting the audio output correctly. Rob did something where he opened
Clip Attributeson each audio clip, and in theAudiotab set:Format = StereoSource Channel = Embedded Channel 1Track = Audio 1Channel in Track = Left- (next row)
Format (NULL)Source Channel = Embedded Channel 2Track (NULL)Channel in Track = Right
NB: this is just me looking at one example, but I think he did different things for different tracks.
Display Different Audio Channels from wav in Separate Tracks
- If your sound recorder saves different mic sources to separate audio channels within a single
.wavfile, you may want to view these as separate timeline tracks so you can adjust them independently.- From the Media Pool,
Clip Attributes › Audio Format = MonoTracks = 2(or 3 or whatever)- In each row, configure each
Source Channelas a separateTrack
- From the Media Pool,

Fairlight Index
- In the
Fairlight Pageyou easily move audio tracks up and down or toggle their visibility
Use a Bus to Group Audio Tracks
- On
Fairlight Page, in menu:Fairlight › Bus Format Add Bus(as many as you want, eg, yourMain Bus, perhaps aDialog Bus, etc)- In
Fairlight Mixer › Bus Outputsyou can send each Audio Track to one or more Buses - THEN, send other buses to MAIN
Apply Filters to Entire Bus
- In the Fairlight Mixer, double click the
Dynamicsgrid icon to bring up theDynamics Panelfor the Bus you want to manipulate
Use Dynamics Audio Compressor
- Reduce audio level by
Ratio(multiple) whenever audio level exceedsThreshold Gain Reductionwill show a blue band towards the top whenever the compressor does its job- Basically, you want to tweak the
Thresholduntil you only see the blue when the level (eg dialog) hits a loud bit
- Basically, you want to tweak the
- Then use
Make Upto get back yourOutputlevel to your target peak level (eg-12.0 db)
Make Dialog a Little More Clear By Adjusting Band 1 In Equalizer
- Open
EqualizerforDialogBus - Turn on Band 1
- Drag right til it sounds slightly better but not too noticeable
Make Something Sound Further Away
- Tip via reddit
First EQ and cut some of the highs then apply reverb to the eq’d sound and change the pre delay and the sound wetness (how much reverb) to fit the ambience in the shot. Meaning if it’s a hallway it’ll be very wet and even maybe have some echo. If it’s open space it won’t be as wet.
Reverb-ing eq’d sound because that’s how sound travels. The reverb you hear from naturally occurring sound will mostly be sans high frequencies. Hence eq to create this perceivable effect of distance.
- I actually got a sound that achieved the result I wanted by just cutting the high frequencies:

Simulate a Walkie Talkie Sound
- I just cut out all the highs and lows with the EQ:

- And added some Distortion (starting with the Lo Fi Radio Preset)

Create Ambient Outdoor “Roomtone” by Looping Smaller Clips with Offsets
- Great tutorial ~ p241 of DaVinci Resolve 17 Fairlight Audio Post Manual
- Find a portion of one of your tracks where no-one is talking. It doesn’t have to be very long, like 2s worked for me.
- In the Fairlight page, Zoom Waveform for the audio to increase the size by holding down
shift+⎇and scrolling up- NB: You will probably also want to Zoom the Timeline (
cmd++) and Increase the Track Height (holdshiftand scroll up)
- NB: You will probably also want to Zoom the Timeline (
- Zoom Waveform until you can see a thin line that crosses above and below the horizontal axis

- Trim your clip to start where the Waveform crosses this axis
- Zoom out a bit, move your playhead a second or 2 to the right
- Zoom back in, and find another point where the Waveform crosses the horizontal axis, and trim your clip to end here
- Now you can stitch together this clip into a bed
- Duplicate it 5 times, pasting it back to back with itself
- NB: reversing every other clip in your bed may make it less obvious. Select the 2nd, 4th, and 6th clips (in the Fairlight Page). Right click and
Reverse Clip - Duplicate your bed
ntimes til you have a minute of roomtone.
- Next, Bounce Audio to a New Layer…
Bounce Audio to a New Layer
- In the Fairlight Page, select the track with the Audio Clips you want to combine (eg, your roomtone)
- Open the Media Pool to the Bin where you want your new combined clip to appear (eg, the
audiobin) - Select all the clips on that track you want to combine
- Choose
Timeline › Bounce Selected Tracks to New Layer - The new clip will appear in your selected Media Pool bin
- When you use your roomtone, target
-45db(via Fairlight Manual):When you know the target volume level for the room tone, set the room tone of all the copied clips to match that level. (If you aren’t sure what level to aim for, try using -45 dB in the Mixer as a guide.)
(OLD WAY I did this):
- There was an outdoor scene / location where we didn’t have a great continuous roomtone captured.
- We did have a few very short bits, but looping any of them individual with crossfades always produced a bit of a metronome effect, so I ended up using a few of them together, on multiple tracks, and overlapping them with offsets, and then creating a longer Compound Clip I could use:
- You may want to create a longer Compound Clip of this strung together.
Sidechain Dialog to Music
- aka “ducking audio”
- You may want to automatically decrease volume of a music track when you have dialog over it
- Open the
Dynamicsfor Dialog tracks in the Fairlight Mixer. - Under
Compression, chooseSend- NB: you do not need to turn on compression for the sending tracks
- In the
Dynamicsfor the Music track, turn ONCompression - Choose
Listen. Set theThresholdreally low andRatioreally high to make sure you can hear it working, then dial these accordingly back to get to “just enough” reduction:
- NB: I was thinking originally of doing this with Buses and not Tracks, but that looks a little bit more complicated per this Blackmagic forum post
Fix Missing Waveforms
- I ran into an issue where I was not seeing waveforms in either the
EditorFairlighttimelines. - Per this forum post, the problem was I had set the cache location to a folder on an external drive that was no longer plugged in.
- I fixed by choosing a cache location (in
Project Settings › Master Settings › Working Folders › Cache files location) to a directory that existed.
Target Loudness
- You can set to different standards, eg, Netflix is
-27 LUTarget- (LU = “loudness units”)
- BS1770-1 is
-23 LUTarget - Rule of thumb: you want most of your dialog hitting the Target Loudness Level
- play a dialog section, and try to get the
IntegratedLoudness to the Target level by boosting the gain of the Dialog (or MAIN) Bus
- play a dialog section, and try to get the
- defs from the Resolve 18 Manual:
Short: Measures the average LU level over a 30-second window following the playhead.Short Max: Shows the maximum level over the same 30-second window. This analysis is required by EBU R128.Range: Measures the dynamic range of the Loudness of your mix (in LU), which is the difference between the average soft and average loud parts of your mix. Analyzes the overall loudness over a played range of the mix, discounts the lowest 10% and highest 5%, and then gives a standardized expression of the difference between the remaining soft and loud levels that were analyzed. The window of analysis is as long as you’ve been playing. This analysis is required by most QC specifications.Integrated: Measures the LUFS value of the portion of the range of the mix you’ve played through. As you play, this integrated value accumulates. This analysis is required by most QC specifications.
Mixing for Broadcast Loudness
- Mixing for Broadcast Loudness gets into some really good technical details of mixing for various delivery formats
Check Loudness at Faster than Realtime with Analyze Audio Levels
- In
Fairlight, you can measure theLoudnessof your film with the set of meters on theFairlightpage that show stats for everything you have played back through the Timeline. This, of course, would take 60min for a 60min timeline. - You can also do this far more quickly in the
Fairlightpage by right clicking a clip and choosingAnalyze Audio Levels - NB: I had different results when performing this operation on multiple clips at once. I think if you want to analyze the levels for multiple clips, the best bet is to select all the clips you want to analyze in aggregate, bounce them to a clip in a new track, and then right click and analyze that combined track.
Mix Audio for YouTube
- From Jason Yadlovski:
- For your key tracks – eg VO / Dialog – in
Fairlightopen theDynamicspanel- Turn
Compressor=On - Set
Ratio=~2.5:1(for dialog) - Set
Threshold=~-26dbto bring the highs DOWN to around-10db - Set
Makeup=~9dbto bring your lows UP to around-15--20db
- Turn
- Then – AFTER you have things sounding balanced (not before) – per Normalize Audio on Deliver on the
Deliver › Audio › Audio NormalizationNormalize Audio=OnMode=YouTubewhich will setTarget Loudnessto-14 LUFS
- See also this vid on Normalize vs Dynamics
Creating a 5.1 Audio Mix
A film festival that I am submitting Super Diva! to asked me to send them a 2k res 5.1 audio mp4 file of the short. The current sound mix is stereo only, so I did some work to put together a quick and dirty 5.1 mix.
My first step was consulting the excellent Davinci Resolve Fairlight Audio Guide.
I also posted and got some help in the Blackmagic Forum here.
After a bunch of research and messing around, here is what I ended up doing.
- Create buses:

DX(stereo) - send all stereo dialog tracks hereMX(stereo) - send all music tracks hereFX(stereo) - send all stereo SFX tracks here- rename the main bus to
MAIN-stereo MAIN-5.1(5.1) - main bus to monitor 5.1 tracksx-stereo- send all the final stereo tracks here for exportx-5.1- send all the final 5.1 tracks here for export
- I realized some Siri sounds / lines were in an sfx track, so I created a new track for these and sent them to the
DXbus because I wanted the Siri voice to come from the same speakers as the character dialog - Create new tracks to capture final stereo mixes:

DX-stereo,MX-stereo,FX-stereo
- Bounce the mixes from each bus to a new track with
Bounce Mix to Track - Create new 5.1 tracks
DX-5.1-mono(mono),MX-5.1(5.1),FX-5.1(5.1)- best practice for a 5.1 mix is to send all the dialog to the center channel speaker, and send nothing else here, so:
- copy the bounced clip from
DX-stereoto theDX-5.1-monotrack. The Pan for this track should have a single blue dot front and center: 
- copy the clip from
MX-stereotoMX-5.1and fromFX-stereotoFX-5.1 - for each of these, right click, choose
Clip Attributes › Audio - the format will be stereo, since we bounced from this. Change
Formatto5.1. - Send
Embedded Channel 1toLeftandLeft Surround - Send
Embedded Channel 2toRightandRight Surround MutetheCenterandLFEchannels
- Optionally: create a new
LFE-5.1track, and copy your most important dramatic moment sound effects clips into this track. Right click each of them and mute all channels, and map only the embedded channel toLFE - Optionally: you can of course get much more fancy with your panning of sounds you want to emit from different points in the room, but what I have outlined here is the simplest quick and dirty version.
- Send
DX-5.1-mono,MX-5.1,FX-5.1, andLFE-5.1(if you have it) tox-stereo - Mute everything except these, hit play. You will probably hear NOTHING, because you probably are setup to be playing the
MAIN-stereotrack through your speakers. In theFairlightpage under the video preview, choosex-5.1and now you should here your 5.1 channel audio. - The meters should show all 6 channels now as well.
- But, you are probably only getting stereo output through your speakers.
- Next, setup your 5.1 speakers…
Save Voiceover Clips to Your Project Folder
(https://www.linkedin.com/in/katya-landau-001108201/)
- If you are recording Voiceover directly from Resolve, you probably want to ensure these clips get saved to your project folder.
- In
DaVinci Resolve › Preferences › Capture and Playback › Capture - Set
Save clips to=/path/to/your/project/folder
Record Voiceover with Fairlight
- NB: If you’re doing this, you probably also want to Save Voiceover Clips to Your Project Folder
- NB: Make sure the track you are recording to is NOT LOCKED
- NB: You might get just a click track if there are already some clips in the track you are recording to. You might clear the track and try again if this happens.
- Recording Voiceover with Fairlight is far more finicky that it should be, and I’ve had tons of problems with this. Here is a list of things to check.
- Set your Mac
System Settings › Sound Inputto the correct device. - In
DaVinci Resolve › Preferences › Video and Audio I/O › SystemsetAudio I/O › Input deviceto the correct device. - In
Fairlight › Patch Input/Output- Choose the correct device on the left (
Source › Audio Inputs) – I had to use the FIRST not second Yeti Stereo Microphone (otherwise I was only getting a click track, not my mic input.) - Choose
Destination › Track Inputand choose the track you want to record to.
- Choose the correct device on the left (
- Click the
Ron the track you want to record to to Arm it for recording:
- Click the
Record(circle) button on the top of theFairlightPage Timelines:
Voiceover Editing Workflow
- I’m working on a ~30m film essay, and have:
- re-recorded bits and pieces while editing
- re-recorded the entire thing, end-to-end
- Going back and editing this back in can get a bit tedious. It’s easy to get lost. So I’ve tried a number of different workflows involving audio transcription to make this a bit more efficient.
- OLD WORKFLOW:
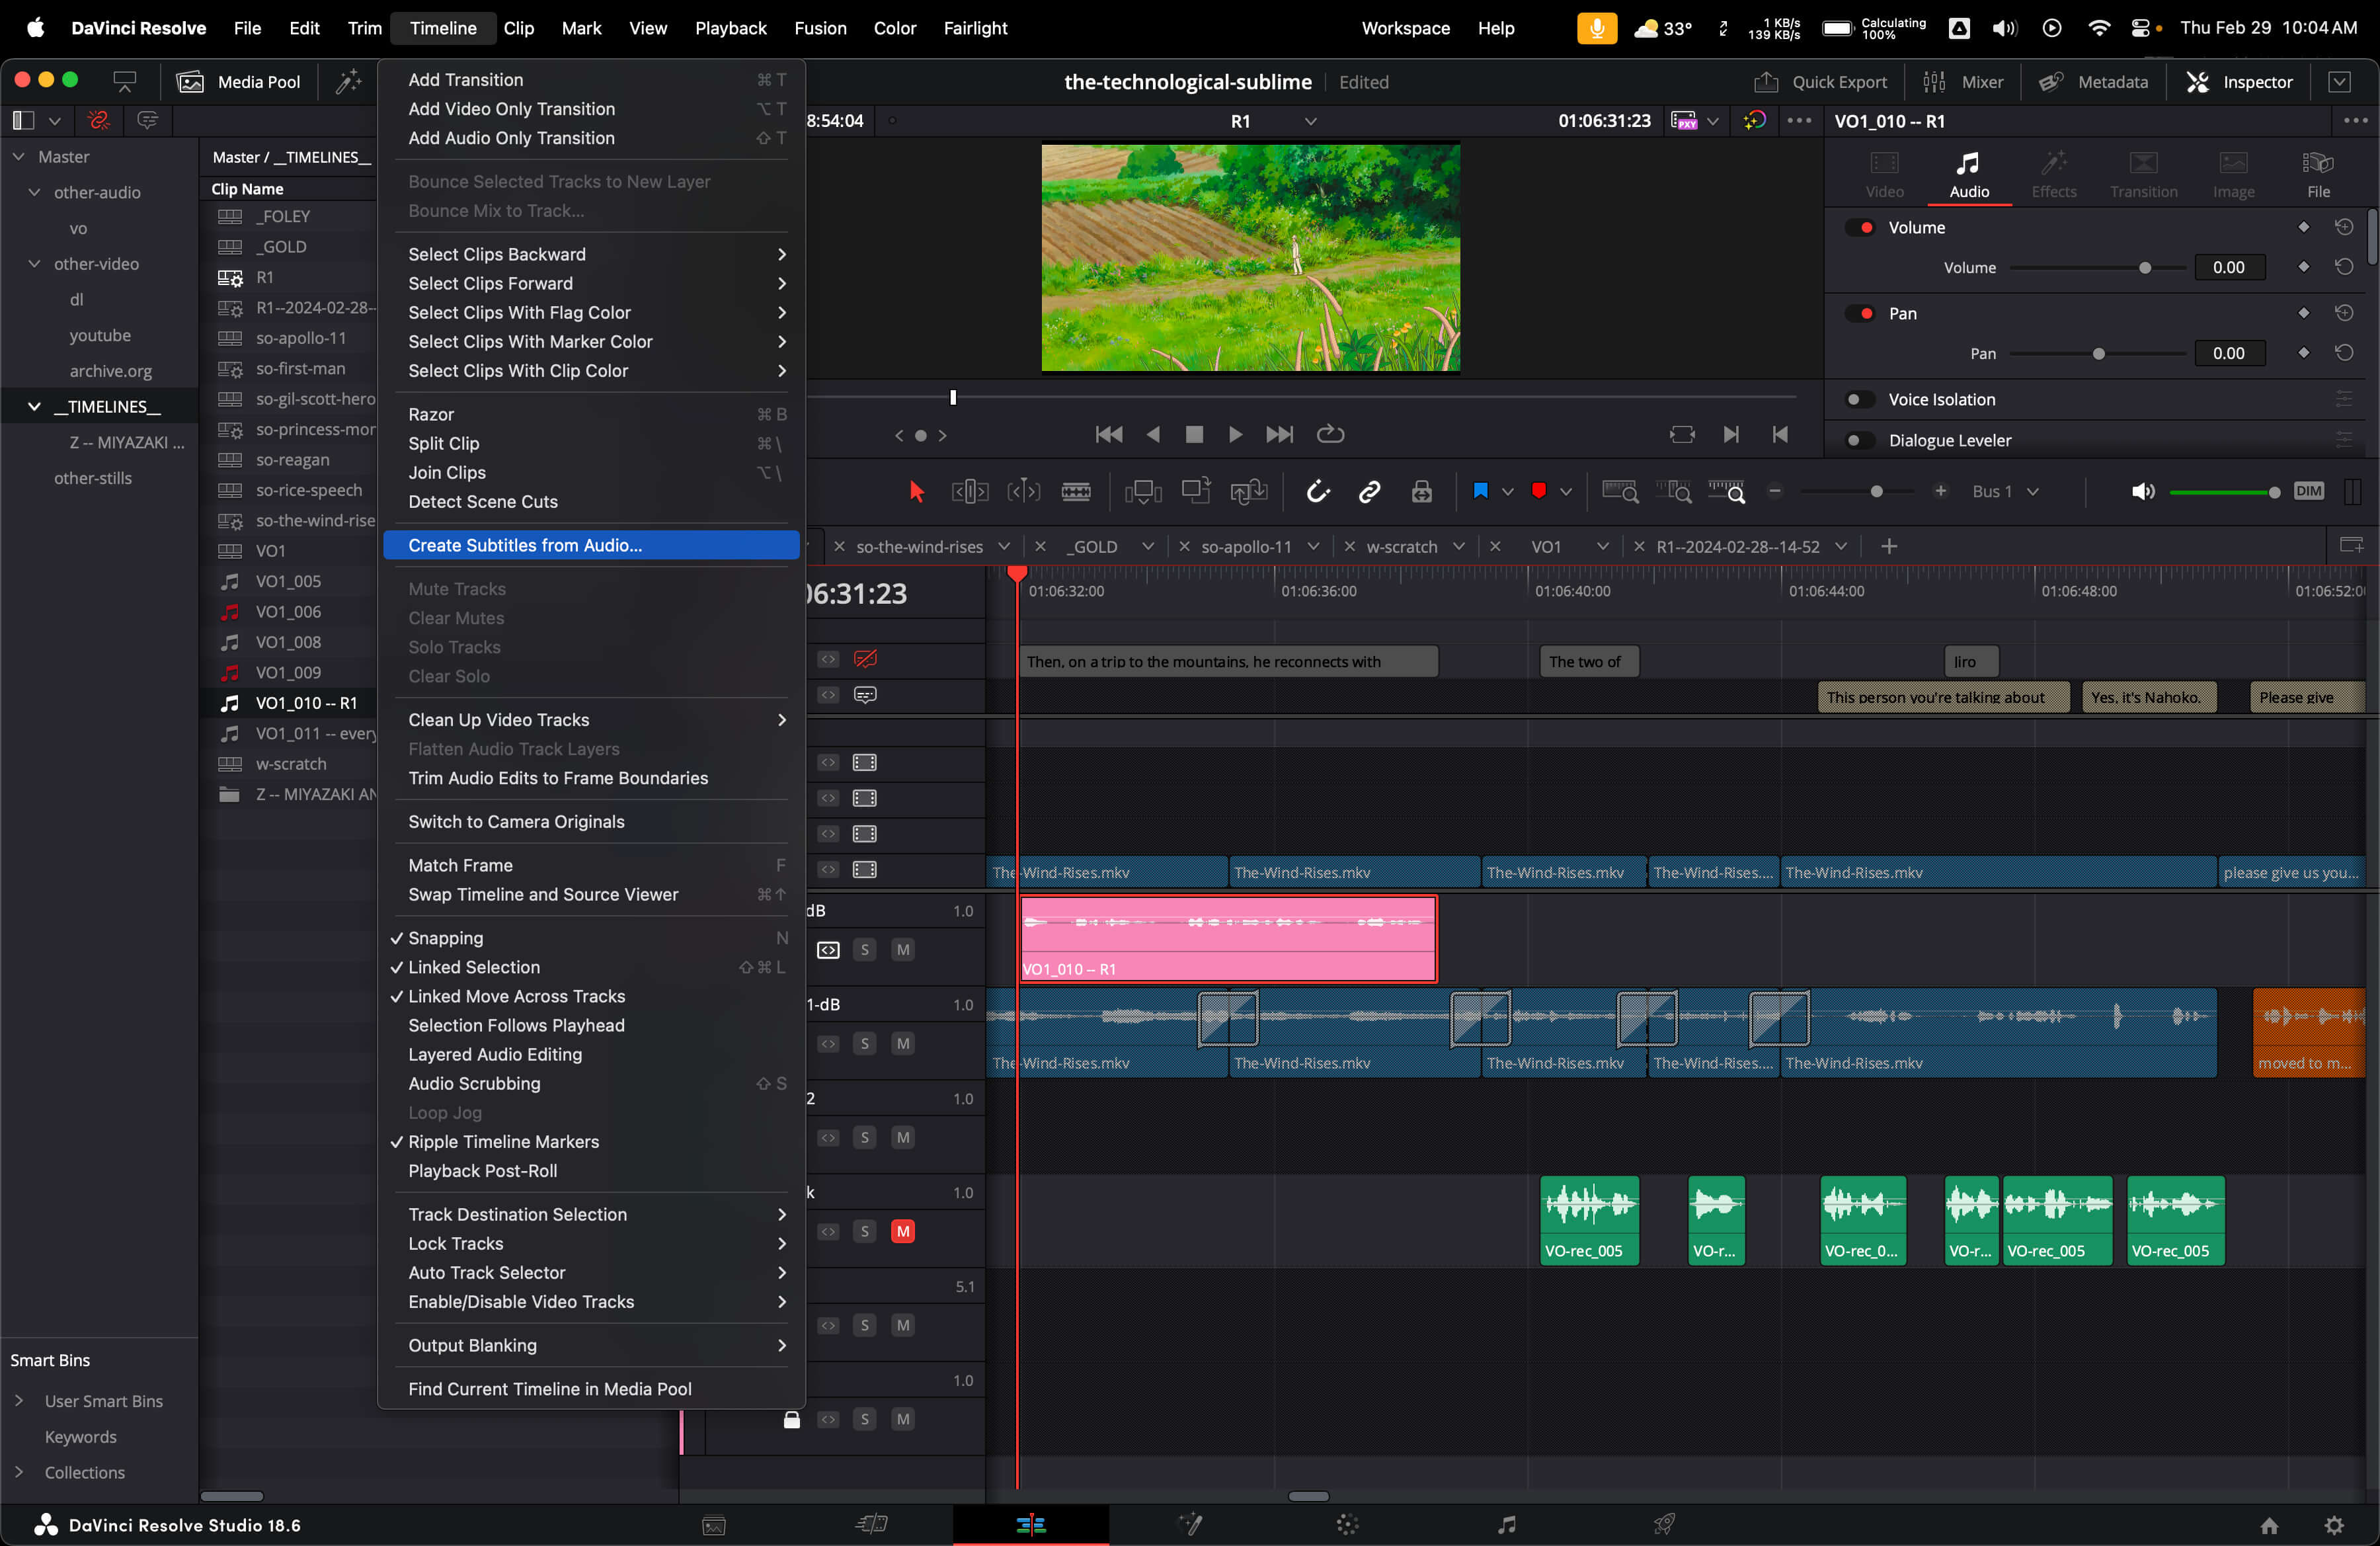
- Select the newly recorded clip in the
EditPage Timeline. ChooseTimeline › Create Subtitles from Audio... - This is cool because it will put the subtitle in the Timeline as well, which can be useful for visual navigation. But I found it got a little tedious / slow.
- Select the newly recorded clip in the
- NEW WORKFLOW:
- This has definitely been feeling much faster.
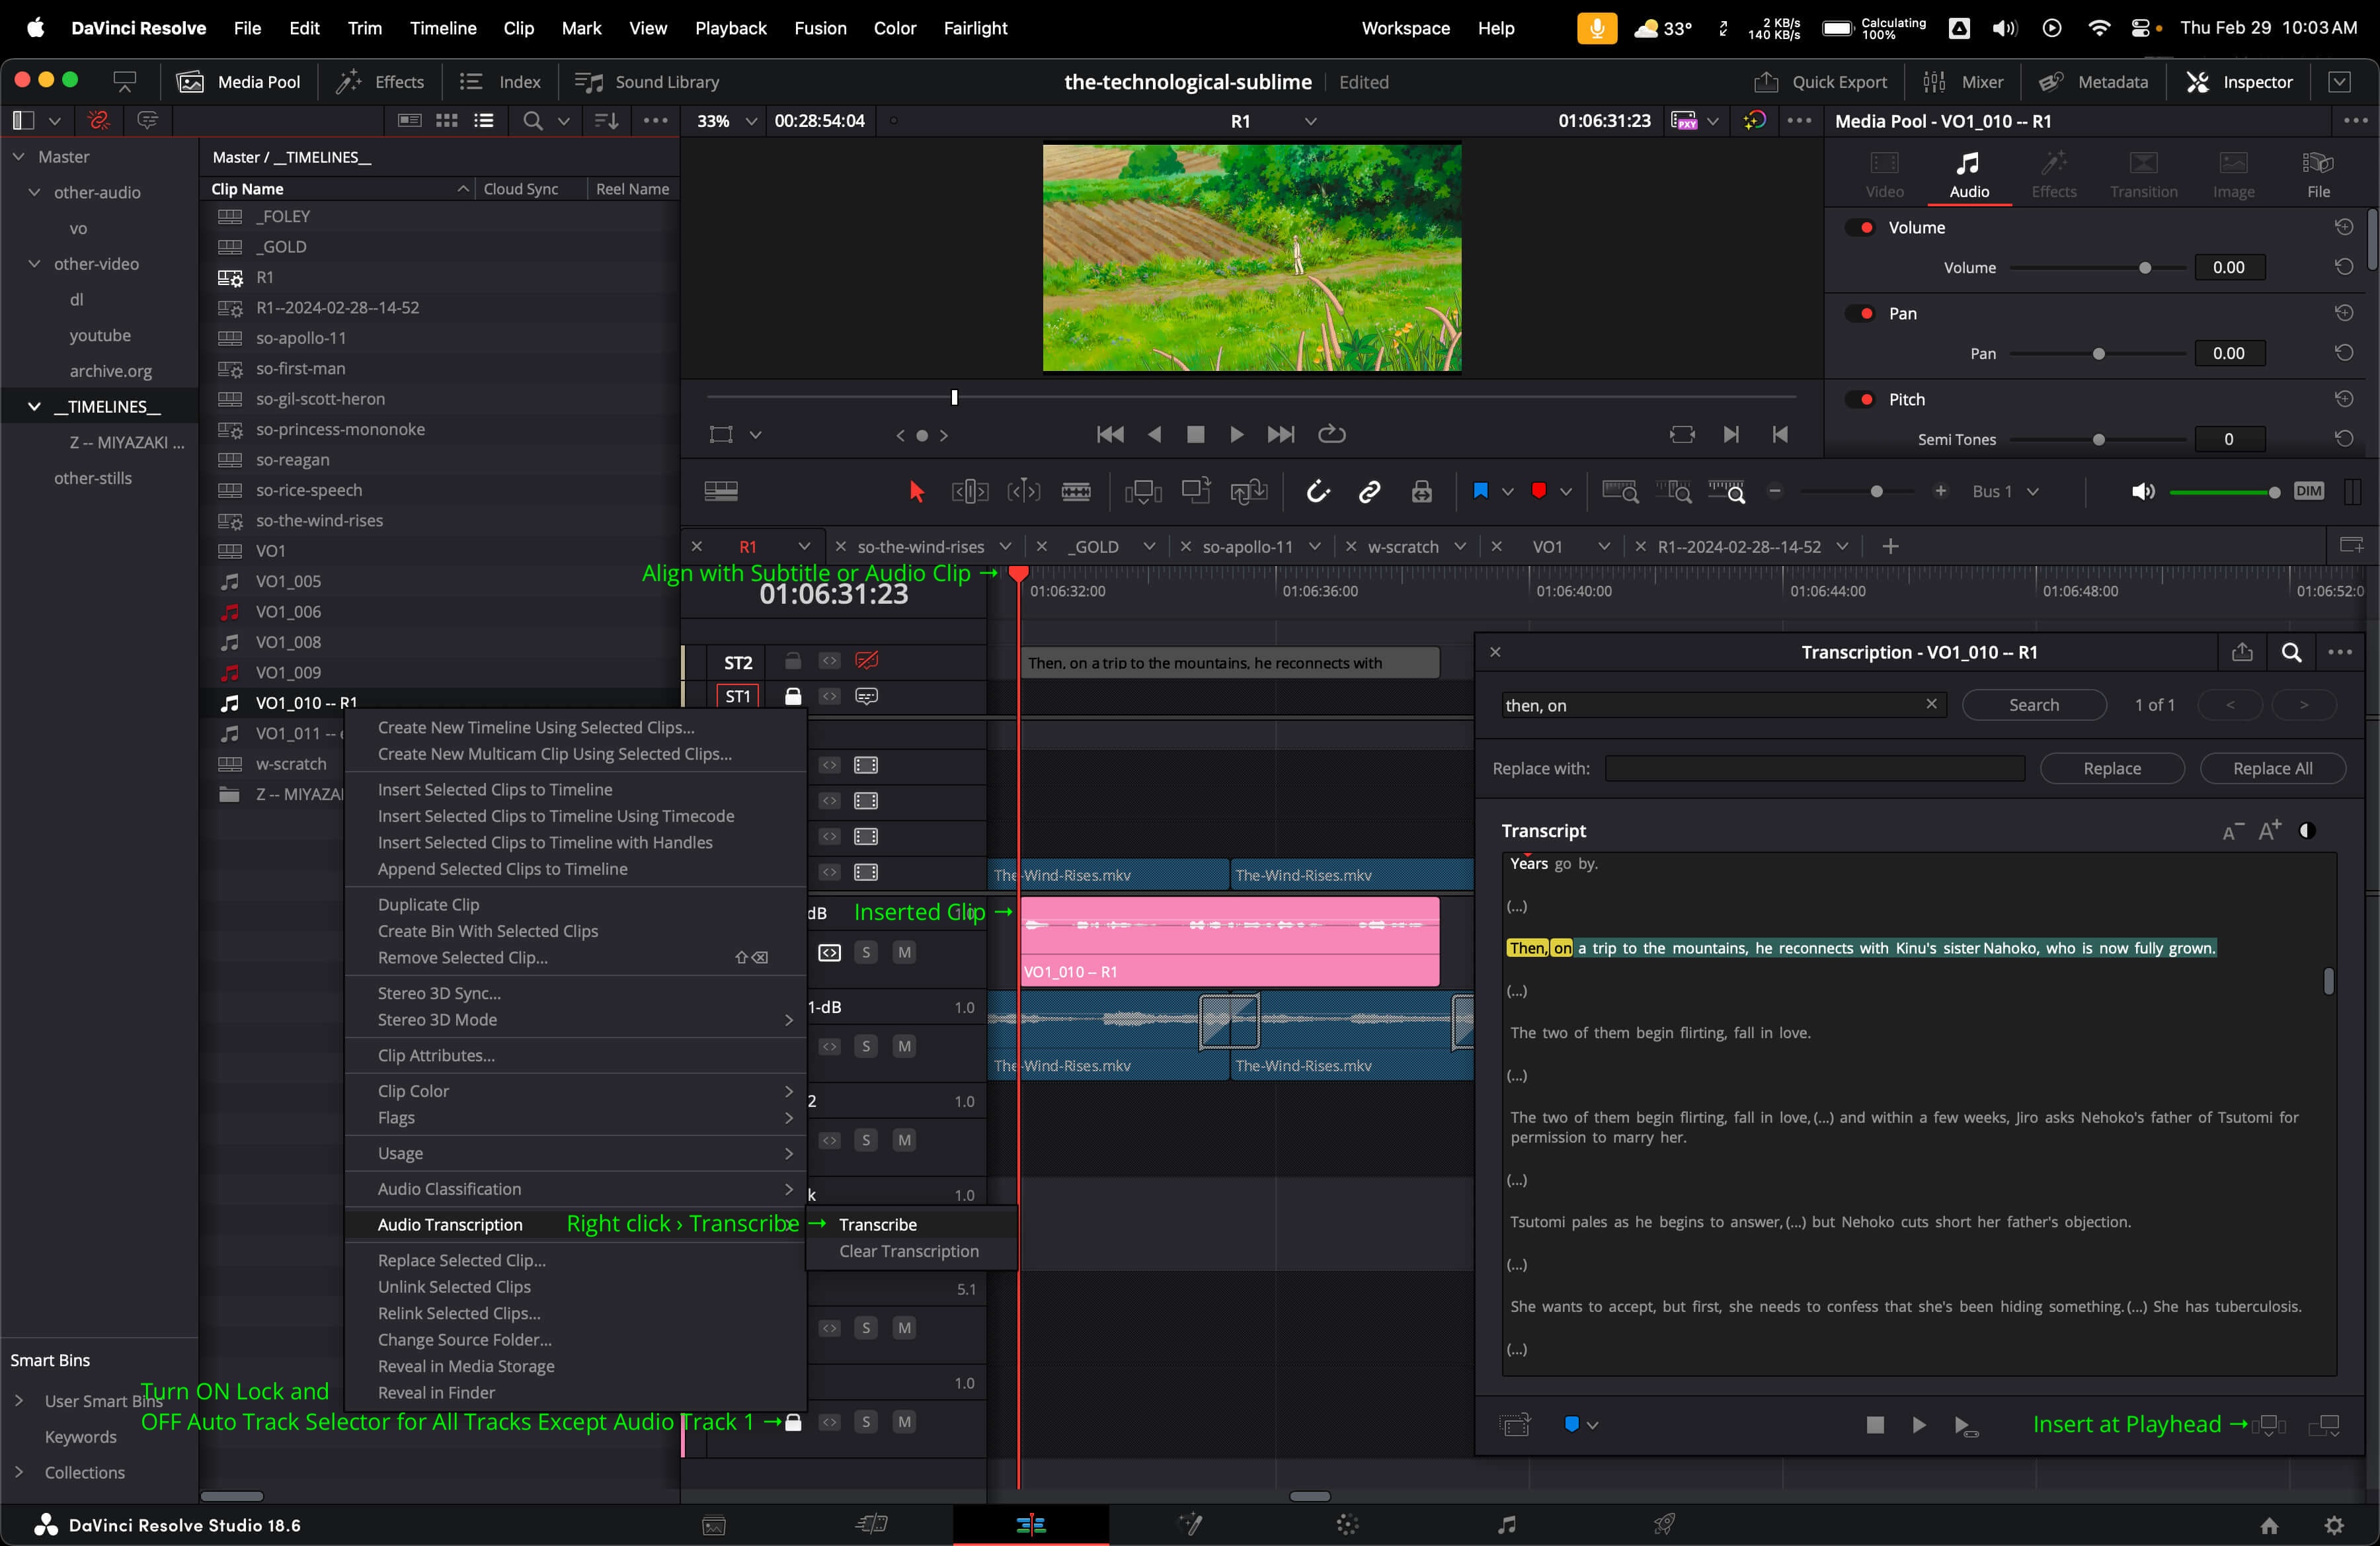
- Right click the newly recorded clip in the
Media Pooland choose:Audio Transcription › Transcribe- this will transcribe the audio if it’s new, or just open the transcription if it exists. - Setup your timelines for optimal speed, so things don’t get overwritten or bumped aside by default. I did this:
Lockevery subtitle, video, and audio track. (You can quickly do this by Shift-clicking the lock icon to the left of a track once.)- Turn
OFFtheAuto Track Selectorfor every subtitle, video, and audio track. (Same Shift-click trick.) - Make sure Audio Track 1 is the destination for your new voiceover clips. I created a new track and moved it up a bunch of times.
UnlockAudio Track 1.- Turn
ONtheAuto Track Selectorfor Audio Track 1. - I left the old voiceover clips and subtitle clips in place, so I could align the Playhead more easily to where each clip started.
- Open the transcription for the new voiceover click. Highlight the text that you want to insert, then hit the
Insertbutton on bottom right of the Transcription window. - This should insert that portion of the clip into Audio Track 1.
- NB: Make sure to check the very end of the clip is not truncated. (Mine often were.)
- The next thing I did was remove the old voiceover audio (leaving the subtitles in place). If your subtitles are
Linkedto your audio clips, do this:- Make sure the voiceover subtitle track is still
Locked. Unlockyour old voiceover audio track.- Select the old voiceover clips.
- Hit
⌘ la few times until you see the lock icon disappear. - Hit
delete - This should delete the audio clips but leave the subtitles.
- Make sure the voiceover subtitle track is still
Setup 5.1 Surround Sound Speakers on Mac for Davinci Resolve
- Setting up 5.1 surround sound for Mac is not exactly plug and play. After a bunch of research, here is what I ended up doing.
- Purchase:
- (1) @ $200 ESI GIGAPORT eX Desktop 8-Output USB Type-C Audio Interface
- (1) @ $300 JBL LSR310S 200W Powered 10” Subwoofer
- (5) @ $135 each JBL 305P MkII Powered 5” Two-Way Studio Monitor
- (5) @ $9 each Pearstone PM-TRS 1/4” TRS Male to 1/4” TRS Male Interconnect Cable (6’)
- (2) @ $14 each Pearstone PM-TRS 1/4” TRS Male to 1/4” TRS Male Interconnect Cable (20’)
- (7) @ $4 each Hosa Technology 1/4” TS Phone Female to RCA Male Adapter
- (1) @ $5 Hosa Technology RCA Male to 2 RCA Female Y-Cable - 6”
- Grand total: $1281 - after talking to a few folks at B&H, this was about as economical as I could get the monitor setup and interface to the Mac – originally I thought I was going to have to drop $800 on the USB interface alone, so I was pretty happy with this outcome.
- This sub has 2 inputs, hence the extra 1/4 cable and RCA y-splitter to get channel 4 into both inputs on the sub.
- In the
Audio MIDI Setupapp on your mac, find theGIGAPORT eXandConfigure Speakers.- Change from
Stereoto5.1 Surroundand map the channels as follows:
- Change from
- In
Davinci ResolveopenPreferences › Video and Audio I/O › Monitor Speaker Configurationmake a newMonitor setnamedGigaport 5.1. Set:Left:1: GIGAPORT eXRight:2: GIGAPORT eXCenter:3: GIGAPORT eXLFE:4: GIGAPORT eXLeft Surround:5: GIGAPORT eXRight Surround:6: GIGAPORT eX
- Make sure you are monitoring a 5.1 bus:

- Solo a mono track, pan it to each speaker to test.
- To export a 5.1 mix, on the
Deliverpage, underAudiounderOutput Track 1select thex-5.1bus. Since this is a 5.1 channel bus, it should say(5.1)next to it. - Render
- Open the rendered file in VLC
- In VLC, under
Audio › Audio DeviceselectGigaport eX. - Watch / listen to the whole thing!
- Ensure dialog is coming out of Center speaker, music and sfx (and whatever else you sent there) are coming out of the Left, Right, Left Surround, and Right Surround Speakers
More Notes on Mixing 5.1
Fixed Bus Mixing
- Create
DIAL,MUSIC, andBG FXsubmix buses andSendaccordingly - Create 2 new Main Buses:
M&E(music & effects: Stereo) and5.1. ForM&E, duplicateMain 1. - Assign the
DIAL,MUSIC, andBG FXsubmix buses to bothMain 1andM&E. - Change
MUSICsubmix format to5.1 Surround. - Then, for example, you can pan one of the tracks such as
DRONE 1to go to left or LFE (with theBoomcontrol at 0.0). - Assign all tracks with no dialog (and no roomtone) to the
M&Eoutput.
Flex Bus Mixing
- setup
DX(mono, dialog),FX(stereo, bg fx),MX(stereo, music),Stereo Out(stereo), and-10 dBTP(stereo) buses DX,FX, andMXare used as submix buses- assign
DX,FX, andMXto output toStereo Out - “One common requirement is to deliver a separate mix with specific true peak value such as -10 dBTP. In this exercise, you route the signal from the Stereo Out to the adjacent -10 dbTP bus. Then, you’ll apply a Limiter plug-in to that bus to limit the signal accordingly.”
- Surround mixing (Flex Bus):
- Right click
A2track header, add 4 tracksAbove First TrackA1DX MonoA2DX StereoA3DX 5.1A4DX 5.1 Rec- “You will bounce the dialogue mix to the A1–A3 tracks and re-record the dialogue submix to the A4 track. The bouncing does not require any patching or arming of tracks. To re-record the mono dialogue submix to the 5.1 track, you’ll patch all six channels of the 5.1 main out to the six channels of the DX 5.1 track input.”
- Patch dialog: https://s3.amazonaws.com/4rk/screen-shot-2022-09-07-12.01.46-oitahbc7.png
- Create a new bin for your rendered files
- Ensure your integrated LUFs =
-24 LUFSfor entire timeline and highest peak does not exceed-2 dBTP(see Monitoring Loudness in Your Mix in Fairlight Manual). UseITU BS.1770-4. - Bounce
DIALtoDX Mono. Make sure to solo the dialog tracks. - “Choose Timeline > Bounce Mix to Track. In the Bounce Mix to Track dialogue, set the Destination Track for the Main 1 bus (Stereo) to the DX Stereo track. Set 5.1 Main to the DX 5.1 track.”
- The last bouncing technique for creating a dialogue stem is to actually record the sound from a bus back into a track.
- 5.1 Mixing Tips - https://youtu.be/M2b8OaSjWbE
- Dialog - pretty much all to center (unless you REALLY want to pan a particular clip)
- Crowd Sounds - 2 tracks, one to front left and front right, other to back left and back right
- Foley - generally pan left and right to FRONT ONLY
- SFX - pan left and right, and you might move eg a helicopter around the theatre
- you might also want an SFX LFE track for important moments to send them straight to sub woofer
- Music - often mixed in 5.1 already - some people send bass instruments to LFE, others think you should only use the LFE for SFX
- Music - pan left and right, but bring it back off of the screen a bit (to separate it from the dialog)
Delivery
Export for YouTube
- NB: have not tried this yet but it looks promising:
- In this YouTube Video by CaseyFaris, he recommends:
- Add clarity to human voice by decreasing the dynamics music track (~26:35)
EQto turn down the music track at Frequency4by1-2kwith a narrow scoop to reduce frequencies that conflict with the human voice Video:H.265Resolution: 2000x frame rate (eg48000for24fps)Quality:3840x2160(4k - even if you shot at less to ‘trick’ the YouTube compression algorithm)
- Add clarity to human voice by decreasing the dynamics music track (~26:35)
Export for Pro Tools
- This was very helpful: How To Create An AAF From DaVinci Resolve For Mixing In Pro Tools
- In
DeliverPage, choosePro Tools Video- I usedMXF-OP Atom(the default), but this resulted in a pretty massive file (like 5 GB for a 15min film)- NB: I think choosing QuickTime and 480x240 res makes a much smaller file and may be a better move

- NB: I think choosing QuickTime and 480x240 res makes a much smaller file and may be a better move
- In
AudioCodec=Embedded in AAFAdd=60frame handlesChannels=Same as source(default)Bit Depth=24(default)
- Per the tutorial, I deleted all the Disabled clips from my timeline / audio tracks
Export for DCP
- This is pretty useful: FilmMaker DCP creation in DaVinci Resolve Studio - HOW TO
Export Letterboxed for Vertical Video on Instagram
- I had a friend with a
1920x1080timeline who wanted to export a letterboxed version for Instagram - Create a
1080x1920timeline - Drag in all the content from the original timeline - this should do what you want pretty much automatically
- Deliver:
Custom ExportFormat = QuickTimeCoded = H.264Resolution = Custom › 1080x1920Frame rate = 24Quality = Automatic › Best
Color Grading
Color Correction and Grading Overviews
(1) The entire video The Perfect Cut › Advanced Editing › Color Correction (8.3) is excellent. In particular, I like how he breaks Color Correction down into basically just a few steps:
- bring color into
REC.709color space. Use a LUT to do this (it will be specific to your camera.) He likes Phantom LUTs by Joel Famularo. - fix the
White Balance. He does this PRIMARILY withTemperature,Tint, andSaturationcontrols ONLY – to add / remove Green, Magenta, Red, and Blue. Adjust to your EYE plus theParadeandVector Scopeto double check what your eye sees (color balance and skin tones). - fix the
Exposuremainly using theExposureandContrasttools. More contrast = brighter, less contrast = darker. If you are shooting in a low light environment, add a tiny bit of exposure, then decrease the contrast, to protect the highlights from getting grainy.
(2) Here is an excellent tutorial from Gerald Undone on color grading / matching.
If you are setting up a list of nodes you plan to use all the time, save it as a PowerGrade so then you can use it across every project in your DB!
Useful Shortcuts for Color Grading
Add Node › Add Serial:alt+sDisable All Nodes:alt+dDisable Selected Node:cmd+d- Show what is selected with
Qualifier:alt+shift+h
Pushing Color with Color Wheels Color Bars
Rob and I were color grading yesterday, and one thing Rob noticed was the blacks in this shot (the jacket, eg) were a little too blue (on the right side):
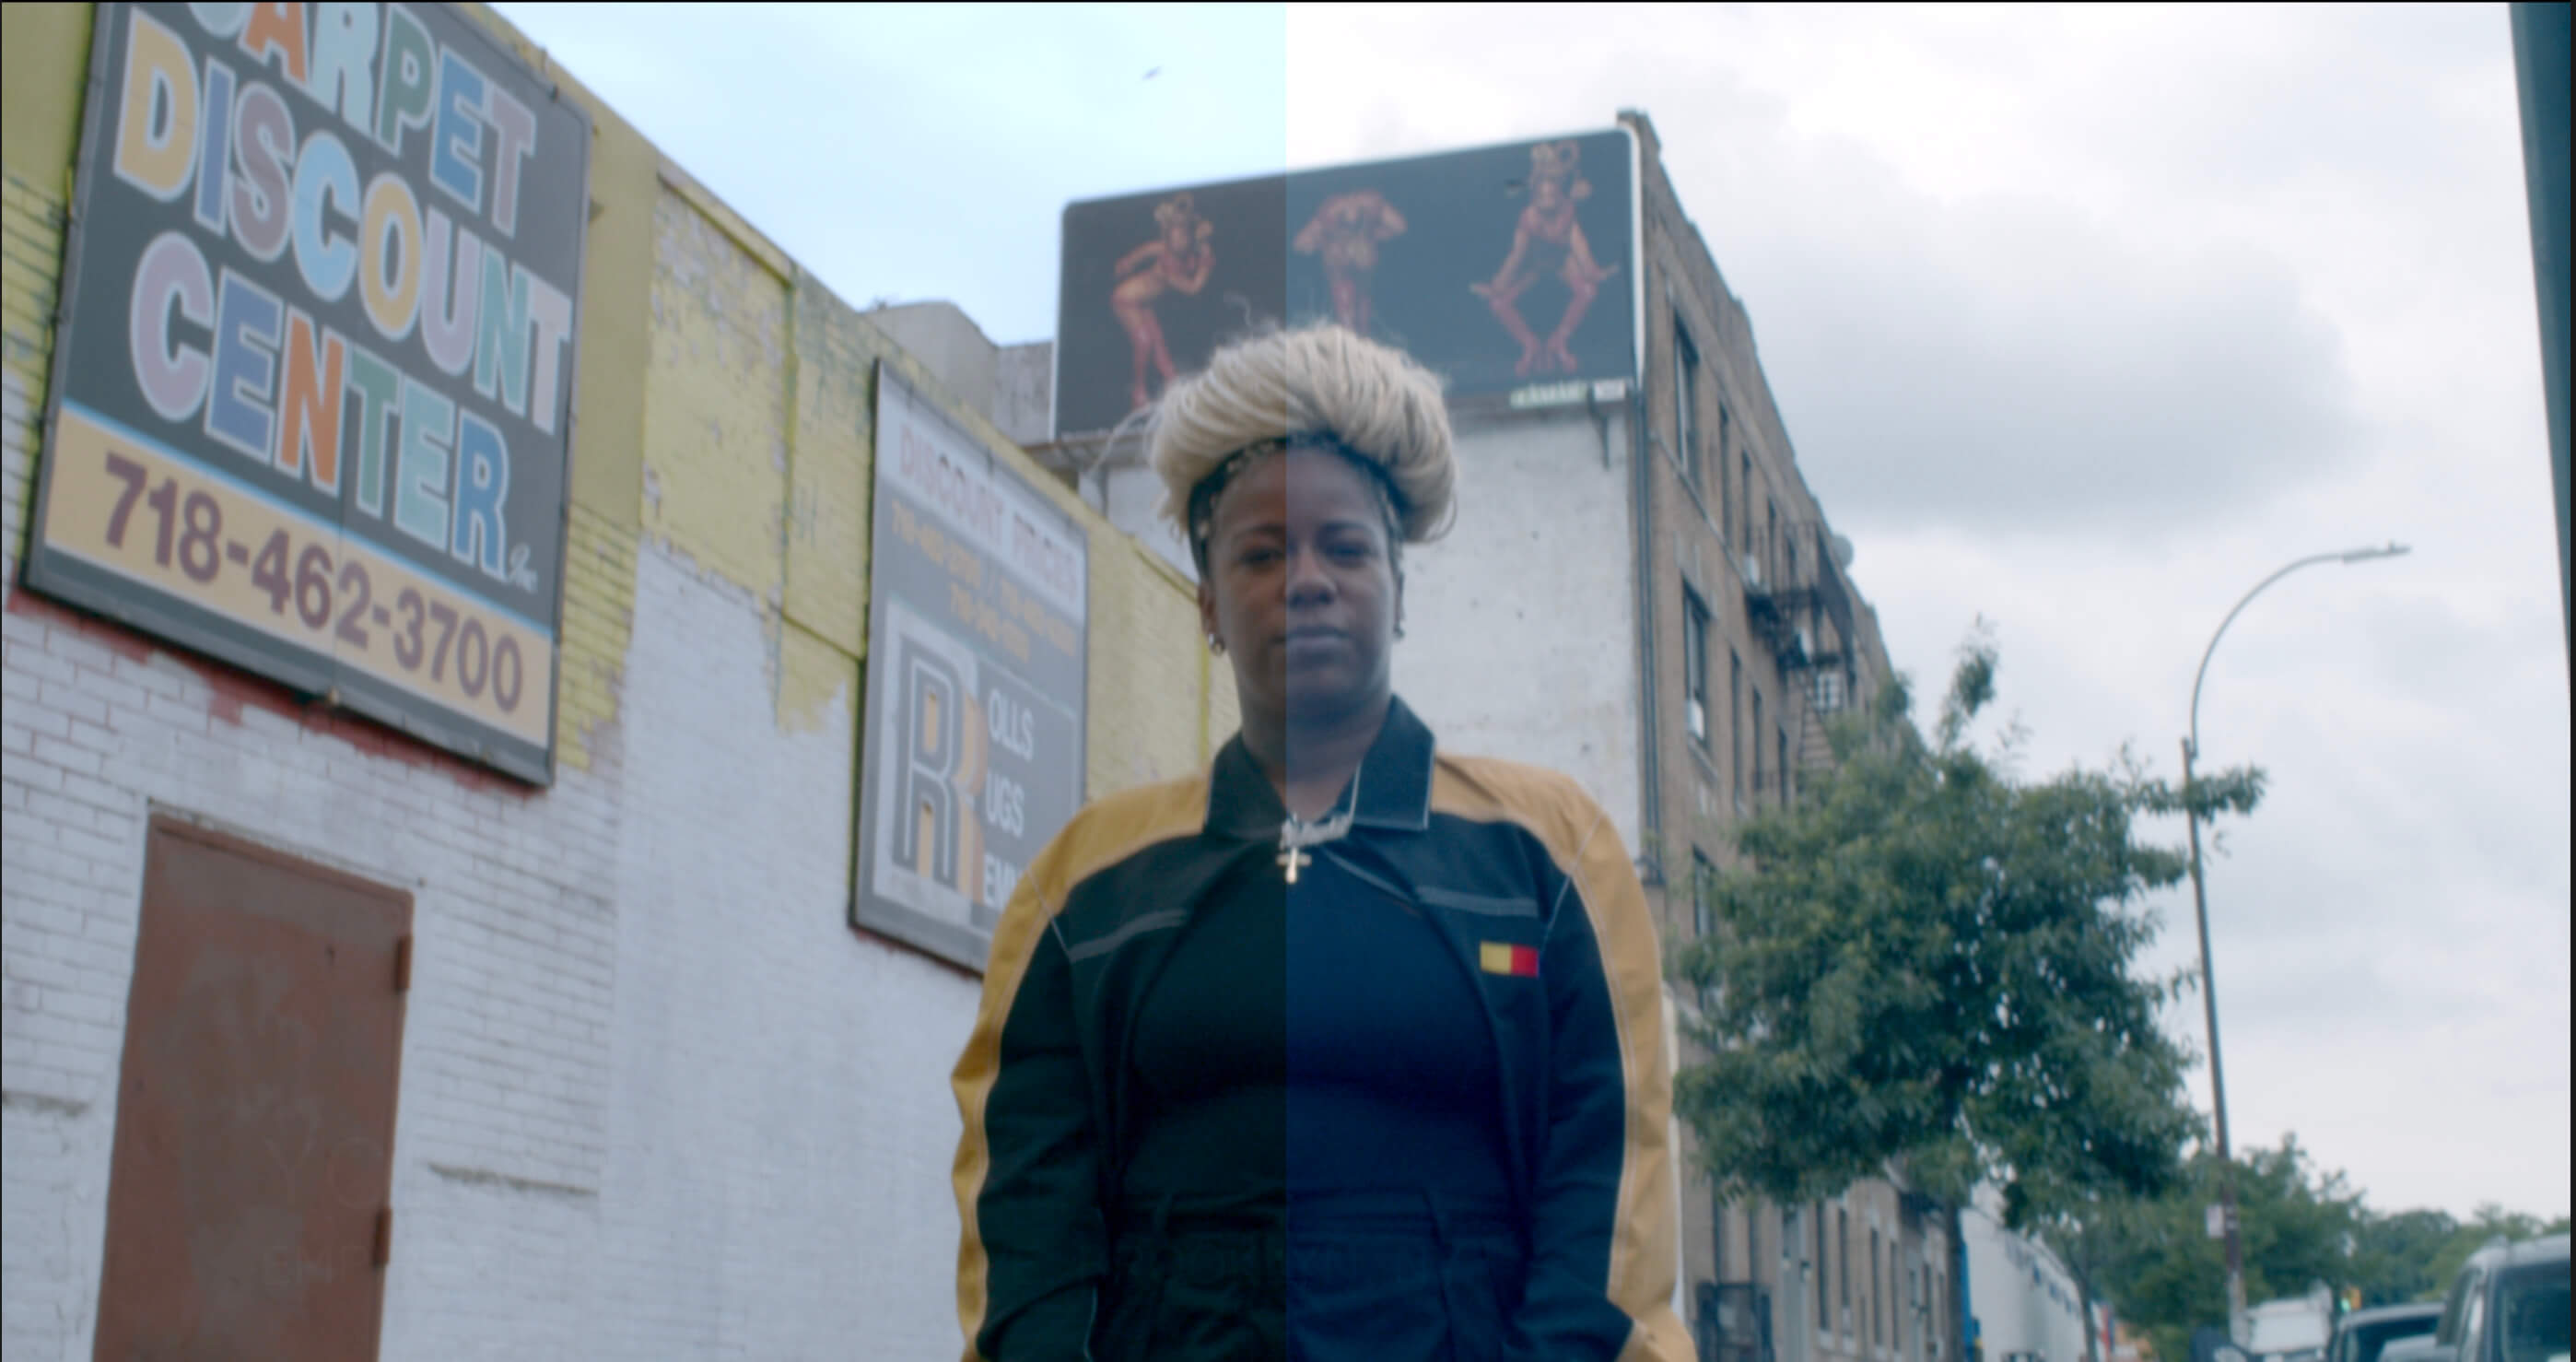
We wanted to push the blacks away from blue, like this:
Our first stab was to use the Lum vs Sat Curve:
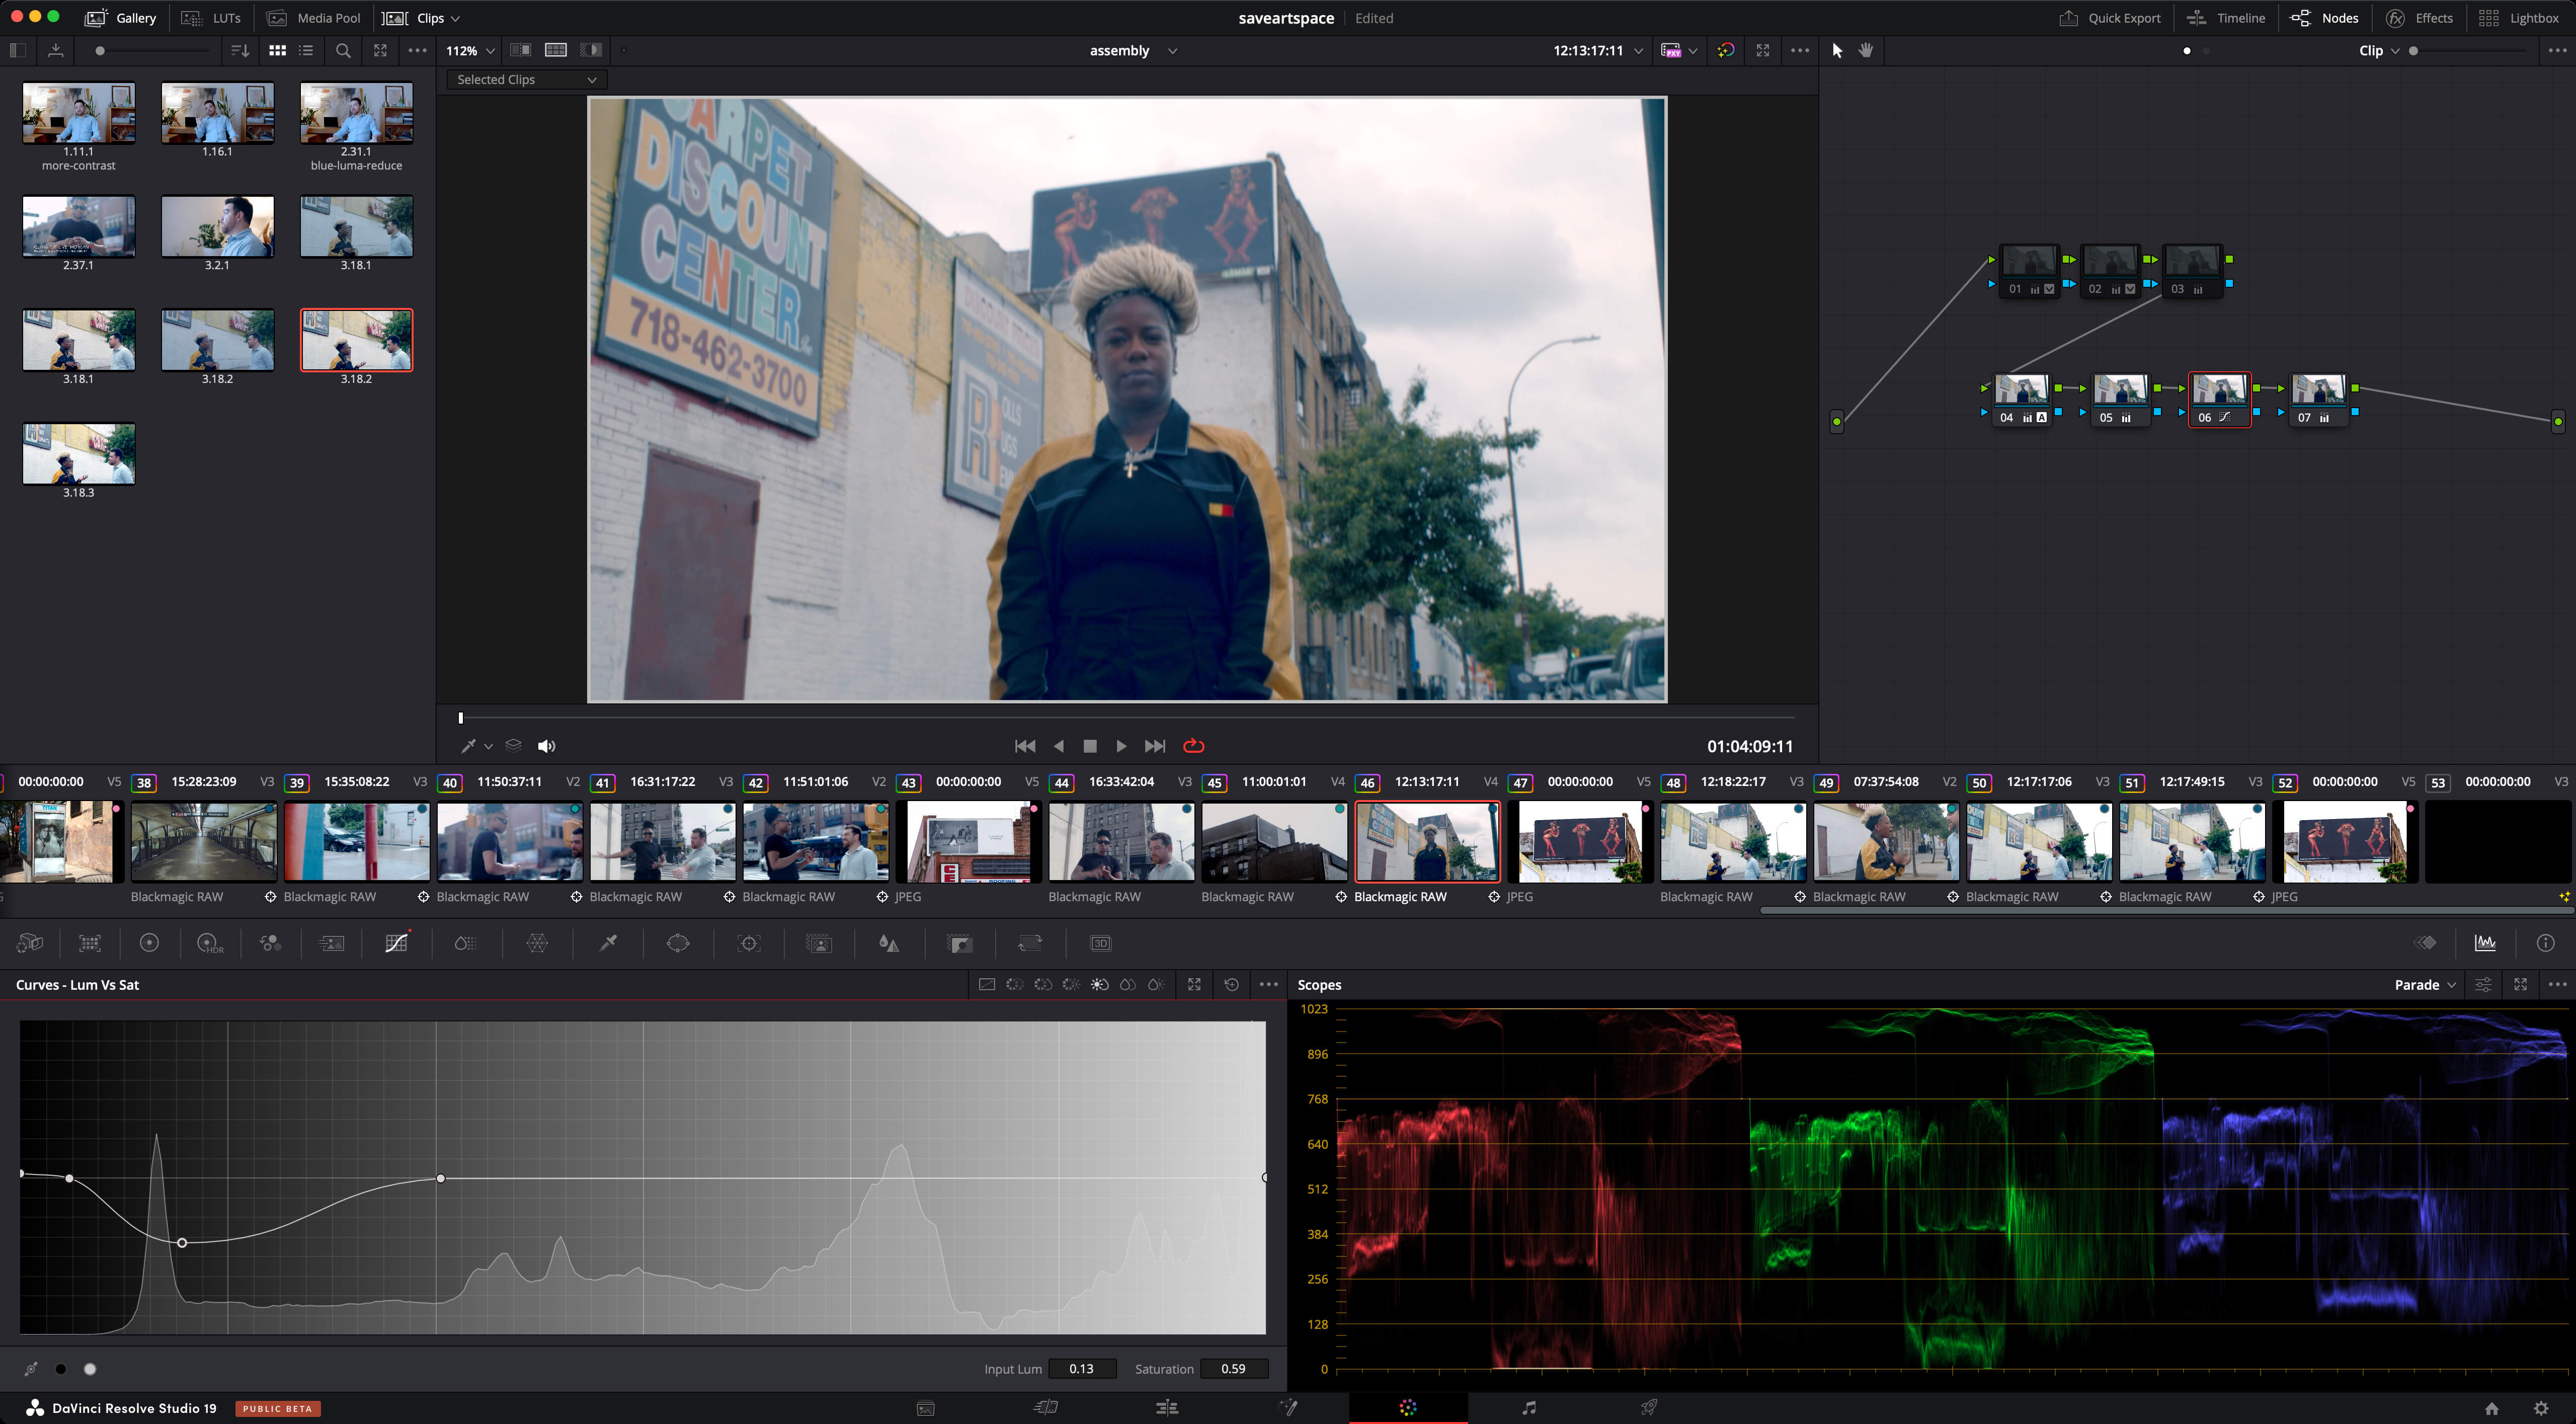
This did the trick, but felt like maybe not the ideal tool – a lot of the YouTube tutorials we have each watched on color grading recommending staying in the Color Wheels tab as much as possible.
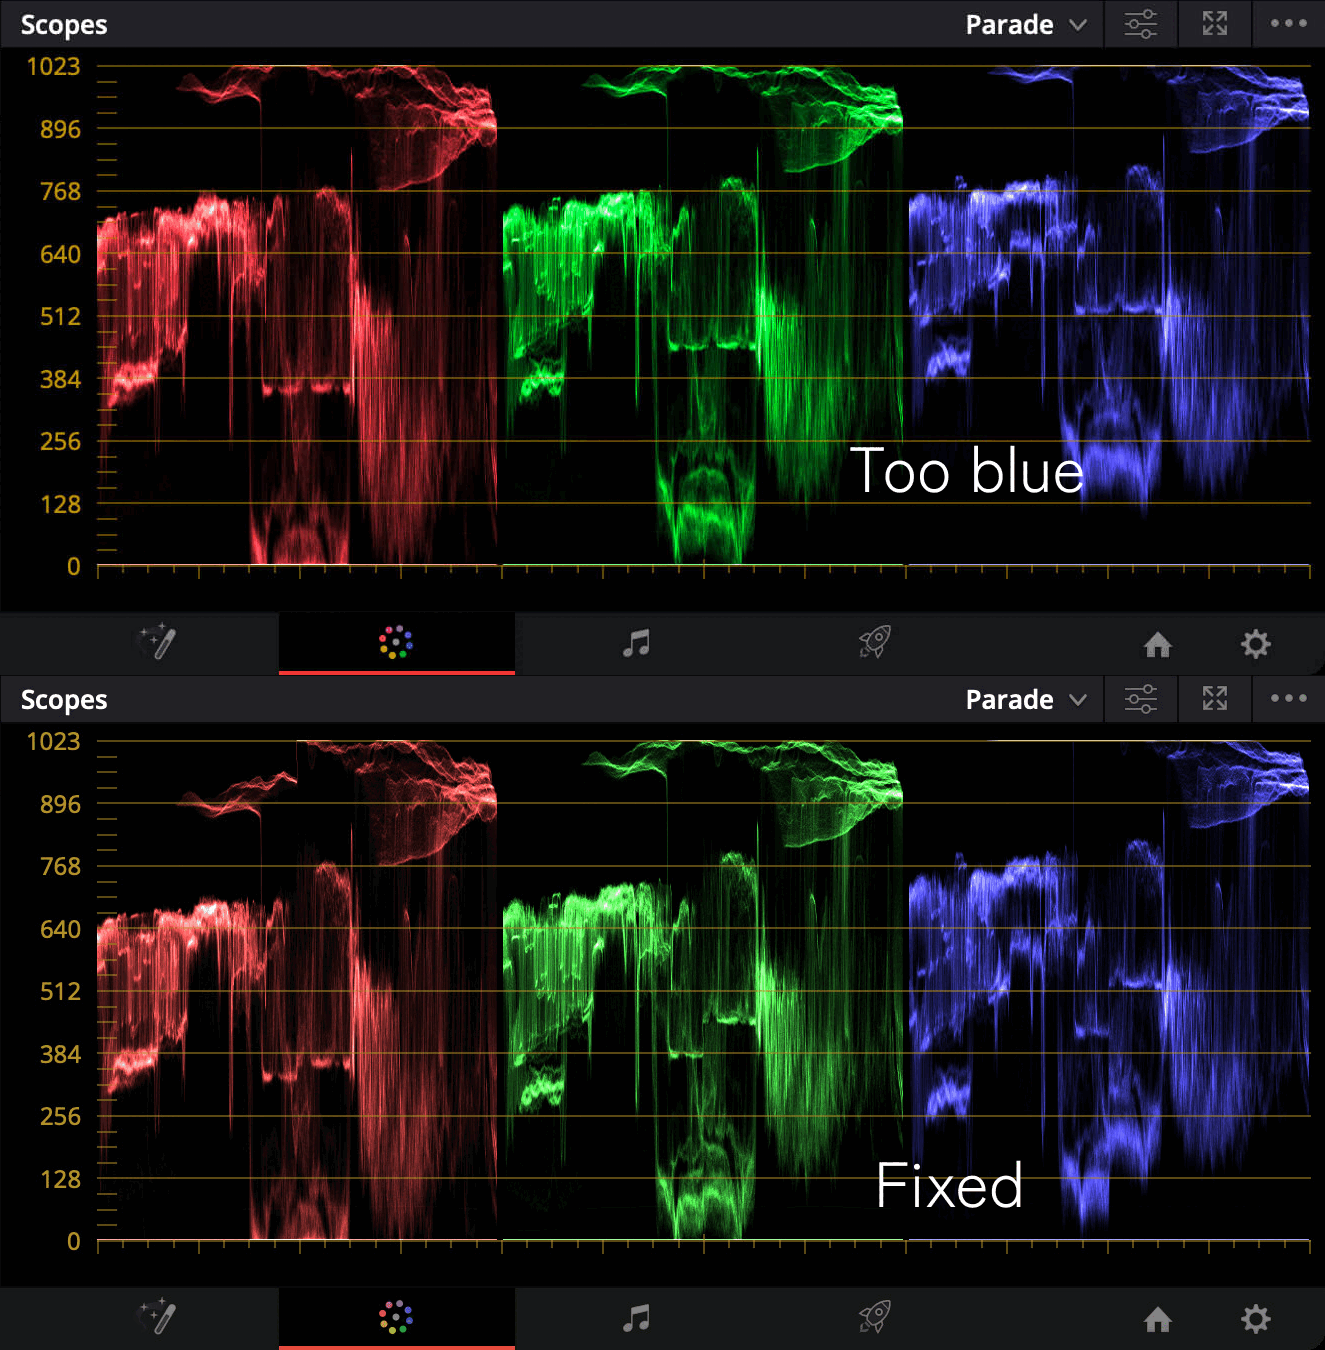
What we ultimately ended up doing was using Color Wheels › Color Bars to bring down the blues by -0.09 in the lows (Lift), and -0.02 in the mids (Gamma) and then bringing up the greens and reds in a few places:
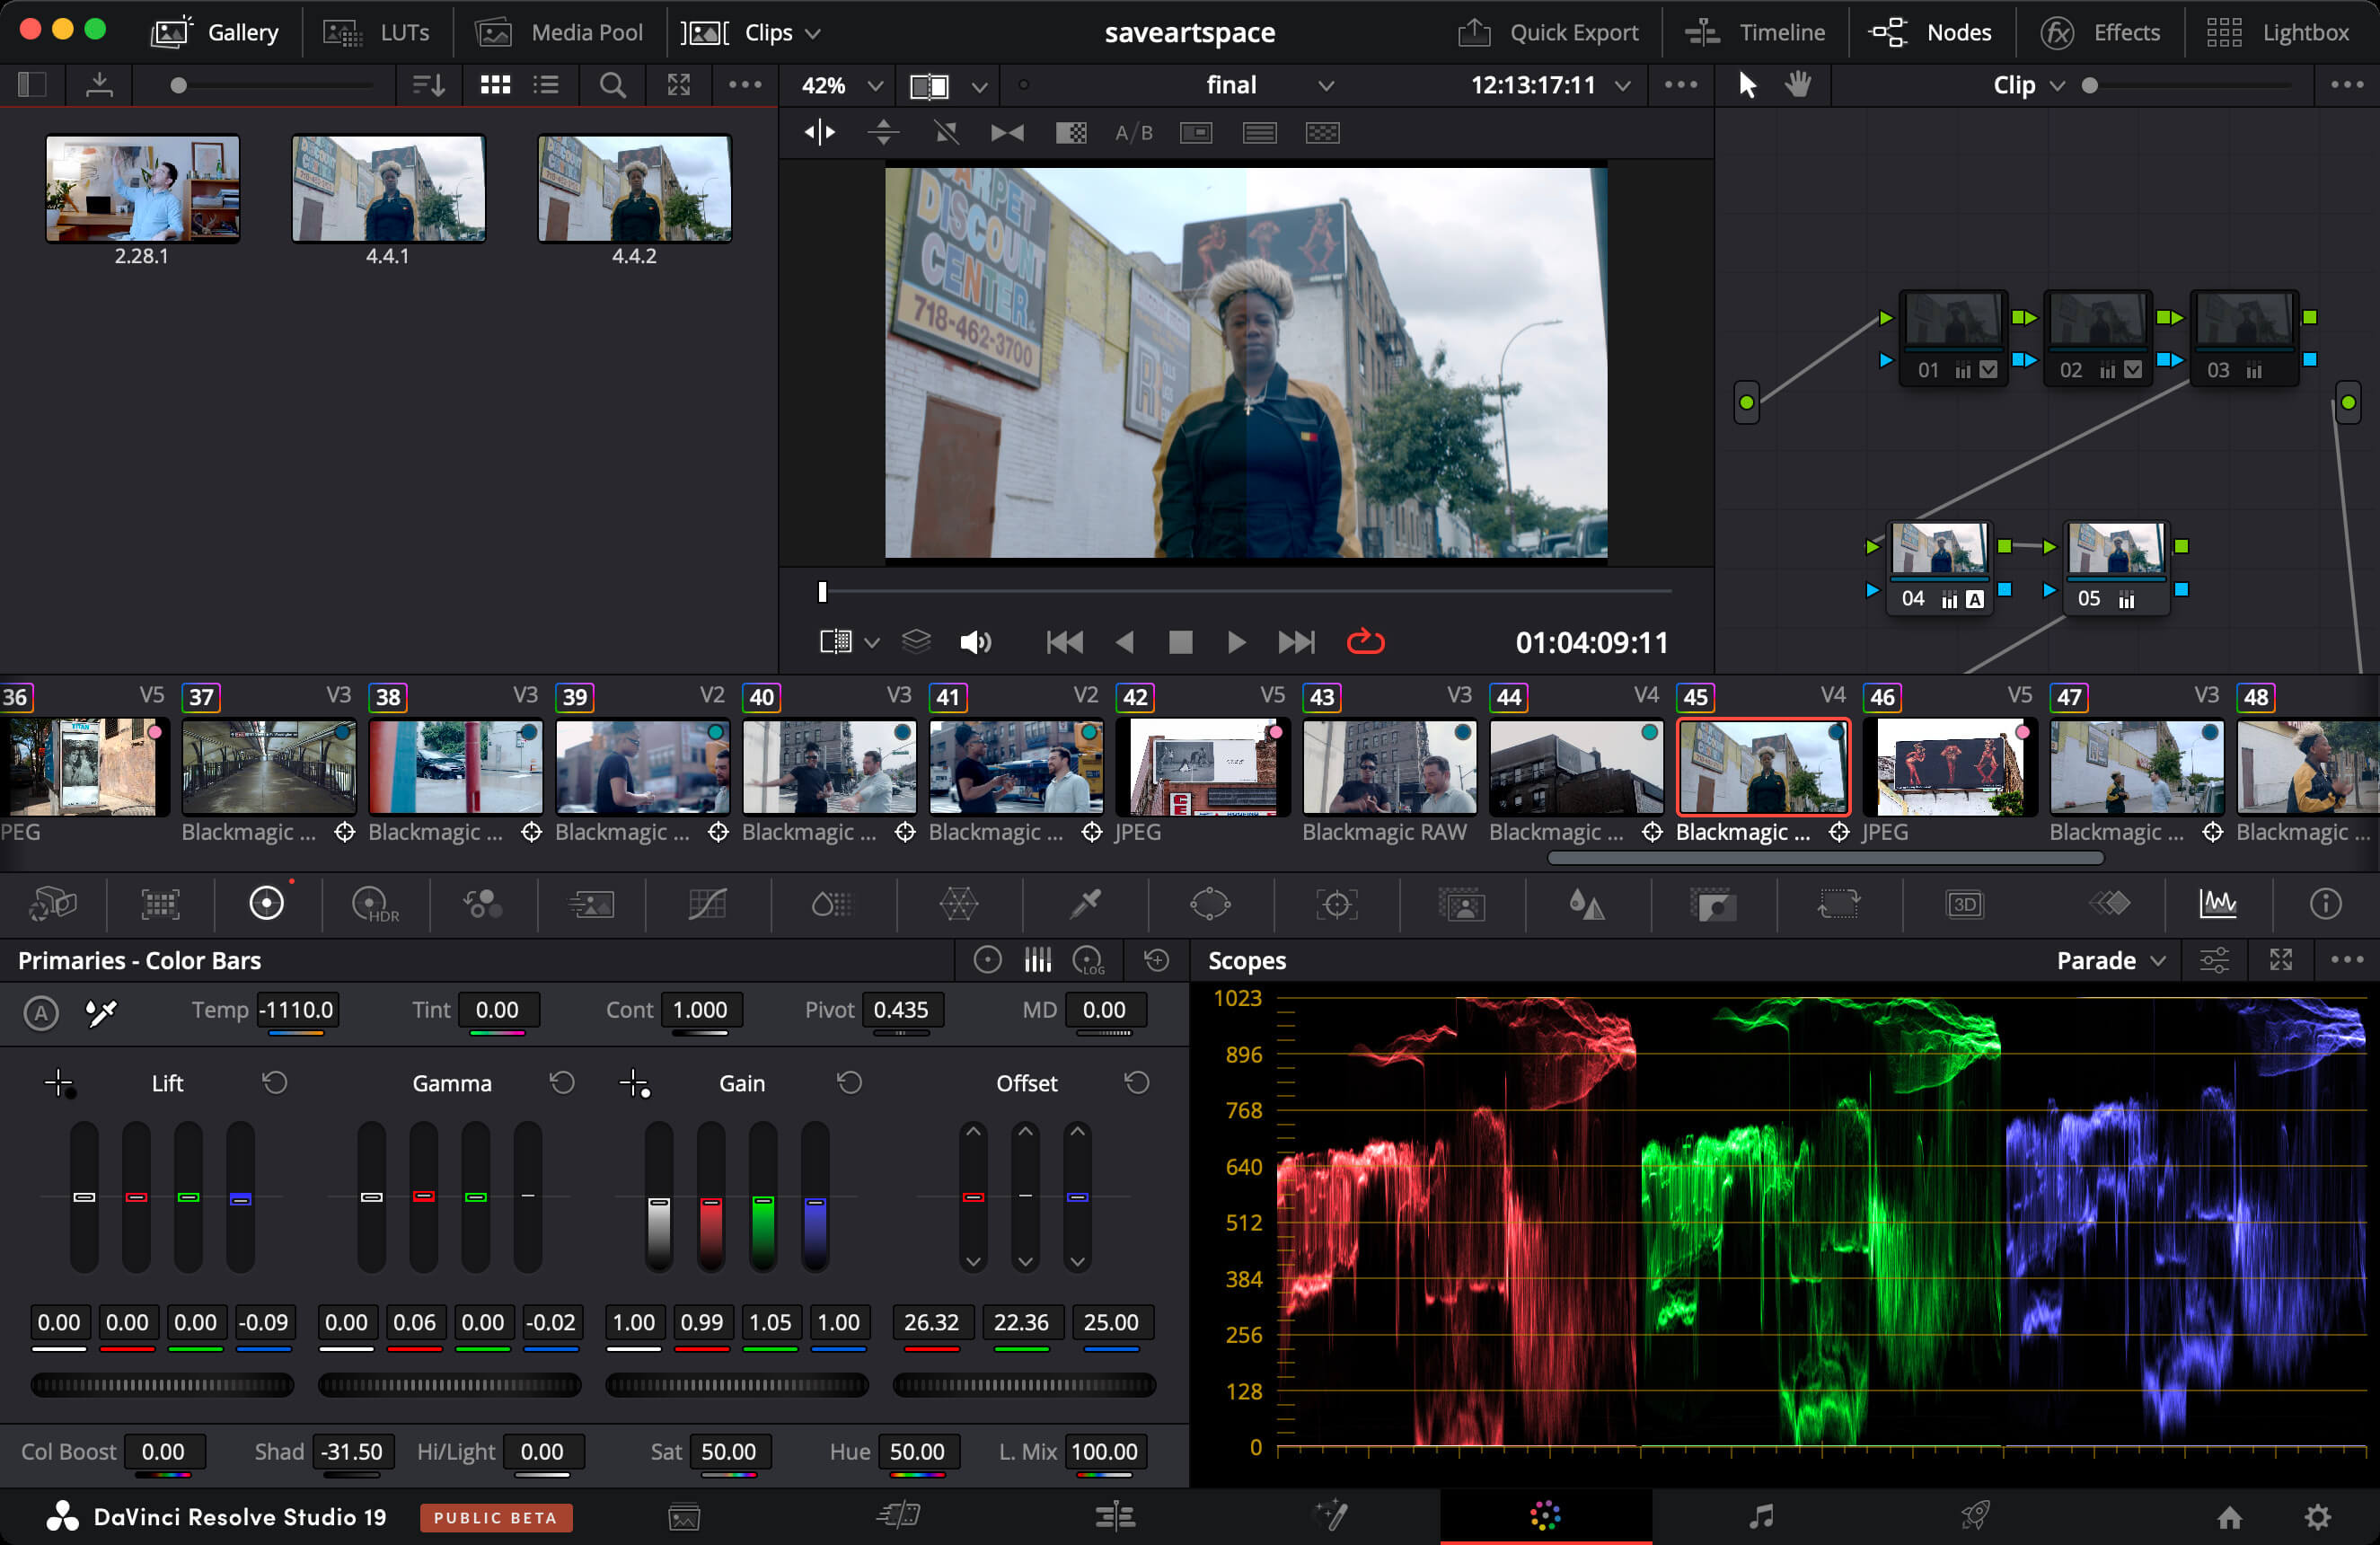
We ended up using the same trick to bring down just the Reds in a shot that was looking too red (in the subject’s ear, I believe).
Quick Fix for Red Skin Tones
- I had a problem where skin tones were looking far too red to my eye.
- My first instinct was to use
Qualifierto select some skin tones, and then pull down the saturation. - This would be pretty BRITTLE tho and tedious to duplicate.
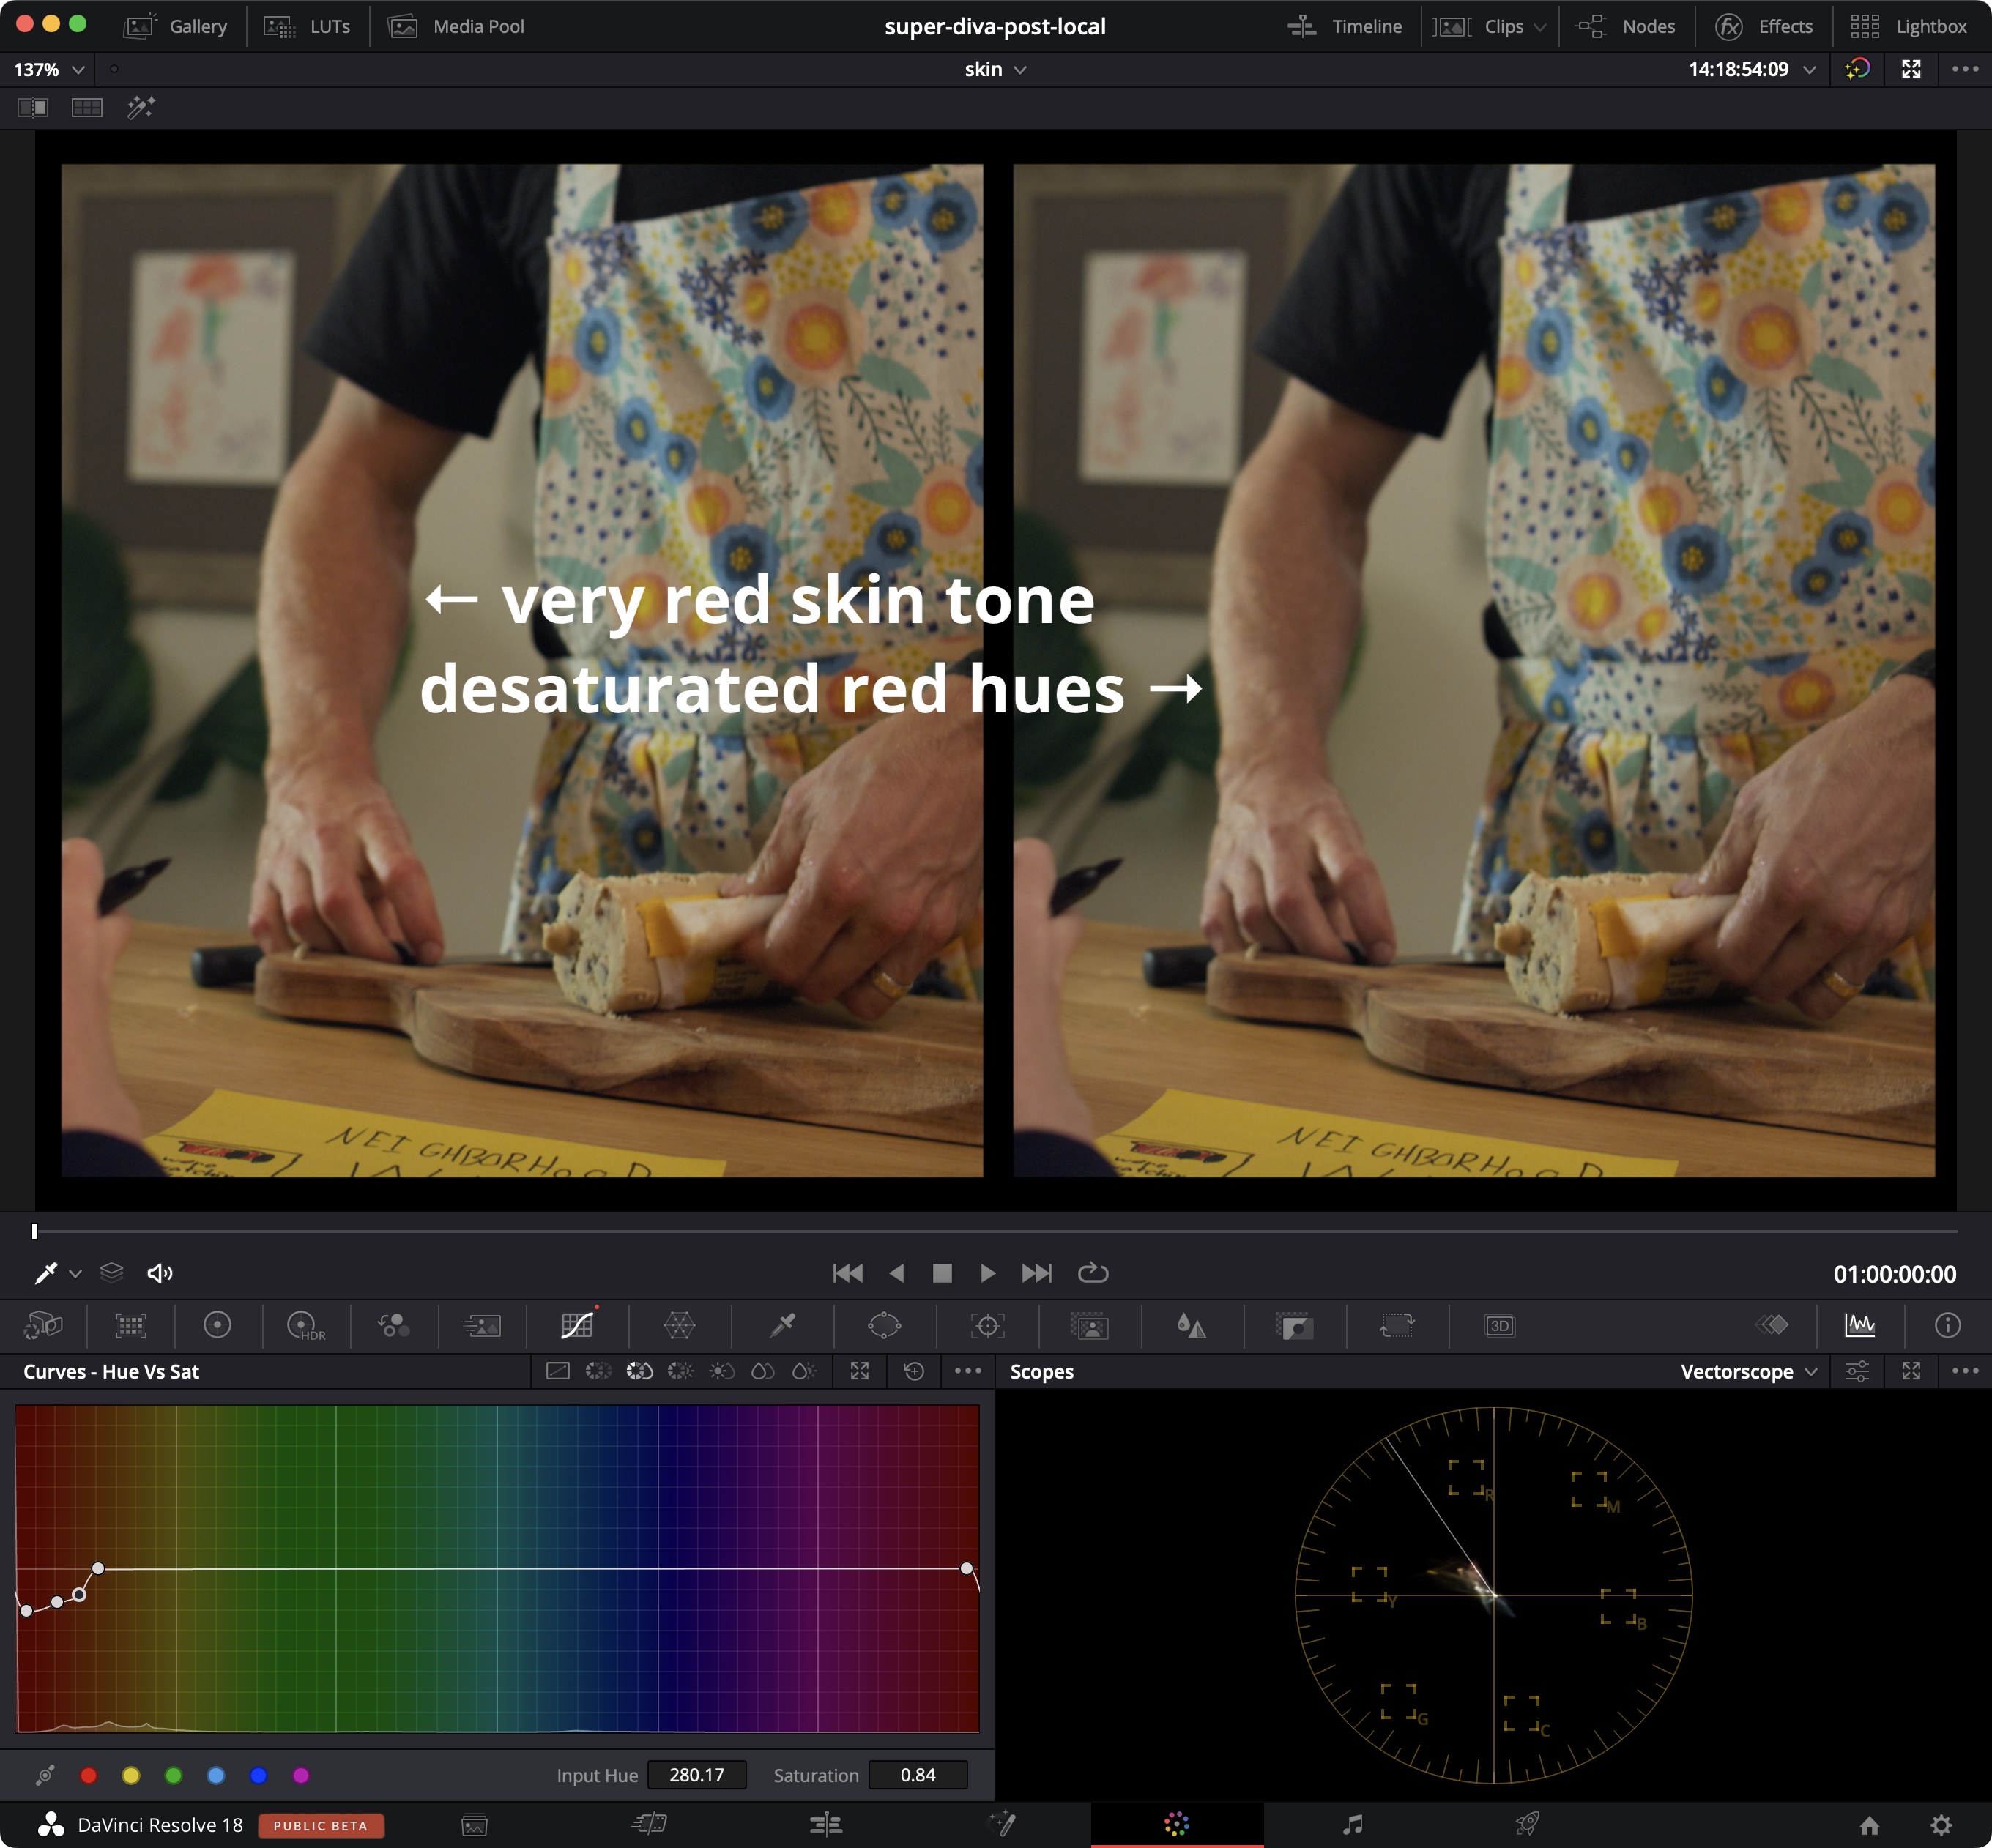
- Rob shoed me a great way to do this (if you don’t have a lot of the same reds in the rest of the image)
- On the bottom left panel, open
Curves › Hue vs Sat - Click the
Splineon the bottom left, then click on some off-color (reddish) skin - This will give you some control points on the
Hue vs Satcurve - Desaturate some of the reds and oranges:

- Example:
Stills
Grab Still→ saves to stills library, you can thenApply Still to Selected Clips- Tip: Label your stills!
Rob’s Basic Process for Color Grading
- Select the BRAW clip and you can do things like:
Decode Using: ClipColor Science: Gen 4ISO: adjust
-
Make 6 or 8 Serial Nodes
-
Node 1: White Balance
- Use the picker under
Color Wheels, then click something white in the shot
- Node 2: Skin
- Open
Scopes › Vector Scopeon right col - do this in an early node!
- select some skin tones with
Qualifier - try to do adjustments in the color wheels that pull the visual towards the diagonal line at like 11 o’clock
- Node 3: Light & Exposure
- Use the dials under Color Picker Wheels to adjust the light / exposure: (the dial graphic thing, not the W/RGB)

- LIFT = shadows, bring down
- GAIN = lights, bring up
- GAMMA = mids, do last and squash (to fix washout)
- can also adjust the numbers under:
- SHADOWS
- HIGHLIGHTS
- MID/DETAIL - adds a bit of blur
- do 2 passes through everything til it looks OK
- Node 4: Spot Adjust
- in middle bottom panel, select
Qualifiertab - use the dropper to click around and make a selection
Denoisethe selection rangealt+shift+hshows what is selected- eg, take out monitor blues → select with
Qualifier - Under
Color Wheel › Hue vs Sat, you should see a peak on the blue part of the selection. Add toggle points, de-saturate the blues by adjusting down - Likewise, you might punch UP the saturation on greens of shirt (in a different node)
- Node 5: Film Grain
Open FX › Resolve FX Texture › Film Grain- if you want to add a film grain
- Node 6: Motion Effects
- controls in bottom left
Frames: 3Mo. Est. Type: BetterMotion Range: MediumTemporal Threshold:unlink Luma and ChromaLuma: 13.2Chroma: 4.8
- Node 7: LUTs
- Black Magic 4k Film to Extended Video V4 is what we used:

Is there a lum vs lum curve?
- No, but you can use the Qualifier to select a highlight, then reset the Hue and Saturation ranges to be everything, and you’ve effectively targeted a specific band of Lum to manipulate.
Working with an underexposed image.
- We had some shots where we captured a relatively low range of luminance, so the
Shadow / Midtone / Highlightswheels were not giving us the control we wanted (effectively we had noHighlightsso this control did nothing). - To make our wheels useful, in the
Primaries - Log Wheels, we used the Low Range and High Range controls to move the ranges of luminance controlled byShadow / Highlights / Midtones - We lowered the
Low Range(increases range affected by Midtones so we could use that to control lower luminance values with it) and theHigh Range(increases range affected by Highlights so we could use that to control lower luminance values with it)
Adjusting the Default Tone Ranges in Log Mode (from Resolve guide)
- When in
Log mode, two additional parameters appear in the top shared controls bar that let you modify the range ofShadowsandHighlightsimage tonality that eachColor Balancecontrol affects, in turn narrowing and widening the range ofMidtones. Keep in mind that while the ranges can be customized, the amount of overlap between each range cannot. —Low Range: Moves the border where theShadowsandMidtonesmeet. Lowering this parameter widens the range affected by theMidtones, and narrows the range affected by theShadows. Raising this parameter narrows theMidtonesand widens theShadows. —High Range: Moves the border where theMidtonesandHighlightsmeet. Lowering theHigh Rangeparameter narrows the range affected by theMidtones, and widens the range affected by theHighlights. Raising this parameter narrows theHighlightsand widens theMidtones. - There are also
SaturationandHueparameters which mimic these settings found within other palettes and modes.
How to Reinstall colourlab Look Designer
- You need to manually delete a bunch of plugin files, see here
Fusion
Layout Multi-Column Credits with Multiple Tab Stops in Text+
- Suppose you want a layout that looks roughly like this:

- In the
Textfield, indent:- Sections by 3 tabs
- Character Names by 1 tab
- ACTOR NAMES by 2 tabs

Tab SpacingSelect Tab=1Position=-0.2Alignment=1(right)
Select Tab=2Position=0.2Alignment=-1(left)
Select Tab=3Position=0Alignment=0(center)
Character Level Styling
- This isn’t the slickest, but may be handy in a pinch, so recording it for future reference.
- Say you have some sort of
Text+node. - In the
Fusionpage, right click in theTextfield of theInspector - Turn on
Character Level Styling - A
Modifierstab will appear. Open that. - Lasso text in the preview area, then set the style from the
Modifierstab. - via Credit Roll Tutorial
Smooth Rolling Credits that Don’t Skip Frames
- I was looking for a good rolling credits tutorial to learn about setting multiple tab stops in a
Text+node, and I stumbled on this tutorial about how to smooth the roll so that frames don’t skip due to subpixel value rounding deltas: Credit Roll Tutorial - Basically, the reason you get a skip is because of subpixel math rounding – you cannot draw a line between pixels, so each line chooses a pixel to draw on. But suppose you have decimal values for the position of the line?
y0=49.638~50y1=54.032~54=4lines of movementy2=57.427~57=3lines of movementy3=61.822~62=5lines of movement
- On the
Fusionpage, setup the following nodes:Text→Transform→MediaOut
- In
Inspector › Transformset:Reference Size › Auto Resolution=CheckedCenter Y=-820.000000(6 zeroes) and set aKeyframeonFrame 0- this will set the INITIAL y-position of the text, so you want it just below the bottom fo the screen, eg, @
-820or-600
- this will set the INITIAL y-position of the text, so you want it just below the bottom fo the screen, eg, @
- THEN, move forward 1 single frame (there is a control where you can do this in far right of the bar with the rewind/play/loop controls) - you should see a
1here when you are onFrame 1 Center Y=-815.000000(6 zeroes) and set aKeyframeonFrame 1- This animation will move 5 lines in this 1 frame. You could also move it just 3 lines per frame for a slower scroll.
- We want the animation to happen every frame, so:
- Open the
SplineEditor (button at top right of Resolve)
- Make sure all the boxes on the left are checked:
Transform1 › Center(Path1) › Displacement - Zoom in a bit with the
Zoom to fit(button with a square with up-right and down-left arrows in it) - Select the keyframes (either by dragging or shift clicking both of them – they will turn green)
- Click the
Set Relative(s-shaped curve) button on the bottom:
- This will repeat the 5 lines per frame movement on every frame of the animation
- Make sure all the boxes on the left are checked:
- Adjust the
Duration(width) of the text clip in your edit timeline as necessary (shorter duration if you have dead space at the end, more duration if your credit roll gets cut short prematurely) - NB: for a slower animation, move fewer lines per frame. For a faster animation, move more lines per frame.
Multiuser
Use an ec2 Postgres DB for Cloud Multiuser
- Rob and I setup an Postgres DB on ec2 (we could not use RDS because of the super user privileges DaVinci requires). This worked OK, but since then, Blackmagic has added first class multiuser cloud collaboration as of DaVinci Resolve 18, so our workaround is kind of unnecessary.


